[Ver. 2.00] Patch Notes (April 8, 2026)
- Patch notes
The update patch to Ver.2.00 will be available April 9 for Guilty Gear -Strive- on PlayStation®4 / PlayStation®5 / Steam / Xbox Series X|S / Xbox One / Windows.
This update includes: one new character, one new stage, additional features, expansions on various features, updates to the Main Menu, expansion of Ranked Matches, an update to a new Battle Version (Ver.5.00), and fixes for bugs.
Overall / Game Modes
- Added Jam Kuradoberi as a playable character.
*Jam will be available after purchasing "GGST Season Pass 5" or the "Jam Kuradoberi" DLC item. - Added the Jam Kuradoberi theme, "Trying hard is hard, so I try hard to try hard."
*Jam Kuradoberi must be selectable in order to use the BGM. - Added avatar and gallery items for Jam Kuradoberi.
*The new avatar and gallery items can be obtained via "fishing." - Added the following BGM to the Gallery Mode and Digital Figure:
- Babel Nose (Jam’s theme from Guilty Gear XX)
- Bao Babel Nose (Jam’s theme from Guilty Gear Xrd)
- Master of your own soul (Main theme of Ver. 2.0)
*Babel Nose and Bao Babel Nose can be obtained via “fishing.”
- Added/updated entries on the following characters in GG WORLD:
- Jam Kuradoberi
- Usagi
- Added DLC stage “Cradled by the Four Beasts.”
*The stage will be available after purchasing "GGST Season Pass 5". - Made adjustments to improve performance on the following battle stages:
- Castle of the Silver Feet
- L'oro Di Illyria
- Original Times Square
- “A Happy Family”
- Seventh Heaven District
- 12-Dimensional Flux Observatory
- Jellyfish Skyarium
- Added the following dialogue interactions:
- Pre-battle introduction lines
- (VS Chipp) Anji/Unika/Chipp
- (VS Anji) Chipp
- (VS Bridget) Dizzy
- (VS Asuka R♯ / VS Asuka R. Kreutz) Unika
- (VS Dizzy) Bridget
- (VS Unika) Chipp/Asuka R♯/Asuka R. Kreutz
- Match victory lines
- (VS Chipp) Chipp
- (VS Unika) Chipp
- Pre-battle introduction lines
- Adjusted priority rules for character colors in online matches.
- Previous: Prioritizes P1
- After Change: Prioritize self
*Offline modes maintain the same rule as before, prioritizing P1.
*Replays maintain the same rule as before, prioritizing P1.
(Ex.) A match with both P1 and P2 using Sol Color 3:
On the P1 side player’s screen, P1 will use Color 3 and P2 will use Color 1.
On the P2 side player’s screen, P1 will use Color 1 and P2 will use Color 3.
On the replay screen, P1 will be shown with Color 3, and P2 with Color 1.
- The character icon displayed beside the Health gauge in battle on the P2 side is no longer flipped.
- When a character’s health reaches 0 due to chip damage, “CHIP DAMAGE” will now be displayed.
Main Menu
- Adjusted the Main Menu design.
- Updated the voices when selecting certain modes.
- Added the “Battle UI Skin” option in the Main Menu and Quick Start.
- Adjusted the default Quick Start setting in Game Settings to Arcade Mode.
- The Help Guide for each mode can now be viewed from Game Settings.
It is now possible to view Help Guide text that was only displayed on initial launch previously.
Battle UI Skin
- Added a feature that allows the player to customize the design of the health bar and other elements during battle.
- The new design “Version 2.00” will be automatically applied after the game is updated to Ver.2.00. It is possible to switch back to the initial design.
*It is also possible to switch to the Battle UI Skin “Vintage Metal” that comes with the Season Pass 5 as a bonus here.
R-Code
- Added the Wanted Poster Skin feature that allows the player to customize their R-Code design.
- Added the new Ver.2.00 design, Rusty Plate.
*It is also possible to switch to the Wanted Poster Skin “Street” that comes with the Season Pass 5 as a bonus here. - VIP Players now gain a unique effect around the character area of their Wanted Poster.
*The VIP appearance changes for the Default (original) Wanted Poster Skin setting, but does not alter any customized settings for Wanted Poster Skins.
Character Select
- Updated the Character Select screen. The characters are now lined up in three rows, with the following adjustments:
- Random selection can now be performed with the L1 (LB) button. The Random Character icon has been removed.
- The “Accessories” option can now be adjusted for some characters when selecting a color.
Affected characters: Jack-O’, Johnny, Jam
*Jack-O’ can start the battle with her mask removed.
*Asuka R. Kreutz can now be selected by hitting Confirm while inputting the R1 (RB) button.
*Accessories cannot be set in Arcade Mode. - Updated the animation for transition into battle.
- Updated the voice for Sin’s name so that it plays his full name.
Training Mode
- Added the “Attack Interval” item to the screen display.
This shows the duration after an attack hits or is blocked when the opponent was able to act until the next attack hits.
This helps when confirming gapless blockstrings or meaty attacks on wakeup.
Ranked Match
- Adjusted the Vanquisher rank reset mechanics.
Rather than resetting to a blanket DR 1500, it now adjusts based on the player’s final DR when the previous phase ended.
(Ex.)
[At Phase End] DR 1800 → [After Reset] DR 1590
[At Phase End] DR 1402 → [After Reset] DR 1471
This adjustment helps players match with opponents close to their level at the start of a new phase.
*This will be adapted when the Ranked Match Phase 3 that began March 1, 2026, ends and resets for Ranked Match Phase 4 on June 1, 2026. - Added rank levels that fluctuate based on DR within the Vanquisher Rank.
|
Vanquisher |
~DR 1599 |
|
Vanquisher I Ignis |
DR 1600 ~ 1699 |
|
Vanquisher II Virtus |
DR 1700 ~ 1799 |
|
Vanquisher III Vindex |
DR 1800 |


- Added badges that reflect DR values in line with the new Vanquisher rank levels.
- Added Imperius, a title for only the top 100 ranking Vanquisher players.

Once you place within the top 100, your Rank will display as Imperius with your numerical ranking shown.
*Your rank will change to Imperius when you place within the top 100, regardless of your current Vanquisher ranking level.
- In line with the addition of Imperius, added “Imperius Ranking (Current)” and “Imperius Ranking (Previous)” to the Ranking screen.
This Ranking shows the top 100 Vanquisher rank players.
*Unlike the other existing Rankings, this is displayed per character, so the same player may appear in the Ranking multiple times for different characters.
Other
- Added an option to “Retry with lower difficulty” to the Results screen after losing in Arcade Mode.
This allows you to retry the match with the opponent starting with greatly lowered health.
This feature is intended to help players who simply want to enjoy the story.
*For Arcade Modes that are not structured in chapters, the difficulty fluctuates the same as before. - Made the following additions/removal of errors displayed at the Results screen.
This is to help the management confirm the status of network-related errors.- Additions:
- It now displays “Failed to upload player data.” when failing to upload the R-Code.
- It now displays “Failed to upload match results.” when failing to upload match records.
- Removal:
- It no longer displays “Overwritten due to exceeding the maximum save limit.” when the replay save limit is exceeded
*Replays will be overwritten when exceeding the maximum save limit, as before.
- It no longer displays “Overwritten due to exceeding the maximum save limit.” when the replay save limit is exceeded
- Additions:
- Adjusted the content of some challenges in Mission Mode in line with the battle update.
- Added an option to fish 50 times at once in “Fishing.”
- Revised the network connection processing at the Title screen to somewhat reduce the server connection time.
- Corrected minor errors in the text for each language.
- PlayStation®5: Fixed an issue where the game would become unable to proceed past the Results screen until a time-out occurred when playing a Ranked Match directly after a PlayStation® Tournaments match.
Battle Related
- Updated the battle version from Ver.4.09 to Ver.5.00.
| Added: April 9, 2026 The following corrections have been made to the English version of the Ver.2.00 patch notes. ■ General
We apologize for any confusion these errors may have caused. |

Across the past updates, there has been a steady expansion of offensive options and potential combos, meaning that more situations could cause a single hit or counter hit to lead into heavy damage. As a result, this made it often the case where a single interaction could largely determine the rest of the developments in the match.
In Version 2.00, we aim to adjust the battle balance by reevaluating offense and defense to strike a better balance between risk and reward. These adjustments do not aim simply to tone down damage, but to make it clear what actions will have a greater effect in different situations, creating a flow of battle where players can gradually turn the tides to their advantage over multiple interactions.
For these reasons, the adjustments include many changes that make it more challenging to gain major rewards from actions. This includes increasing damage proration, consolidating of startup frames, adjusting the state after invincible moves, limiting the return on Roman Cancel, and more.
As a result, the changes may seem more restrictive than before from both a game mechanic and character perspective. The intention is to prevent the baseline from rising further, creating a clear standard for future battle balance.
We expect that the overall flow of battle going forward will take shape with the balance of risk and reward established in this version as the core.
We have re-assessed the ease of converting into combos.
Previously, it was common to see long-ranged pokes as well as overheads and lows lead into combos dealing heavy damage. With this adjustment, we have limited the reward possible so that the value of the hit corresponds to the situation.
On the other hand, we have ensured that combos requiring taking risks or making preparations to land will be suitably rewarding, such as actions that require you to enter close range, set up projectiles, use character-unique gauges, or spend Tension gauge.
Our intention is not to make combos themselves weaker, but rather to make it clear what kind of situations can lead to major benefits.
In Season 3, we added Wild Assault with the goal of creating a new way to use the Burst Gauge and to expand offensive options.
Our original intent was to make it an attack that felt intuitive to use. Over the course of adjusting the mechanic, however, its use cases expanded. While this did create depth to the mechanic, it changed into something that required practice and knowledge to use to its full potential.
As a result, it functioned as a powerful option in battle, but it would lead to greatly different results depending on how precisely it was utilized. Combined with its powerful potential to extend offense, it would create situations that were very challenging for the defender to handle.
In alignment with our intention to emphasize a clear shift between offense and defense in the battle balance, we decided to remove Wild Assault from this version after re-evaluating its place in the game.
We have added Counter Blitz as a new way to utilize the Burst gauge.
This can be activated during the slow-down effect after a counter hit at the cost of 50% of the Burst gauge. It performs a unique attack.
If the final hit of the attack hits when the opponent is near the corner, it triggers Wall Break.
This does not trigger from counter hits of jabs such as Punch or Kick, special moves, or any normals that cannot be canceled.
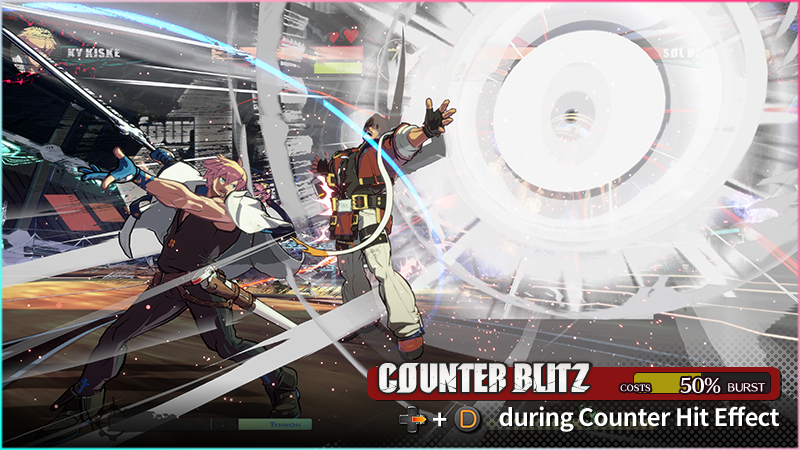
This mechanic is tied directly to a counter hit as the trigger, making it an intuitive way to continue your attack.
While easy to start using at any play level, it also is not something that absolutely needs to be incorporated into your play.
We also expect it to provide more factors to weigh for players who value battle strategy and management of the Burst gauge.
It will serve as a means of rewarding decision making based on the situation, rather than one-sidedly making offense stronger.
We have revised the hurtboxes of all characters when they are in the damage state or blocking.
Previously, due to the differing hurtboxes between characters, some combos were only possible on certain characters, or could connect unexpectedly under certain conditions. This made for unstable combos that could not be consistently recreated.
With these changes, we have adjusted the standard for hurtboxes with the intention of making it clear when combos will succeed. There are two standard hurtbox sizes, with all hurtboxes functioning the same in each category.
Large hurtbox: Potemkin, Faust, Nagoriyuki, Goldlewis, Bedman?
Standard hurtbox: All other characters
This addresses the significant difference in possible combos for only certain characters, making for clearer decision making when it comes to combos.
On the other hand, this does mean that combos previously possible only under certain conditions may no longer work. This change prioritizes the stability and reproducibility of combos.
We have made the same adjustments to the hurtboxes when performing actions such as dashing, backdashing, or air dashing, in addition to blocking and taking damage.
We have added new attack hitboxes that only hit when the opponent is taking damage or blocking (hereon referred to as “follow-up hitboxes”).
Previously in order to stabilize combos we would sometimes need to improve the hitboxes of the attacks themselves, but this could have an effect on the move’s properties as a poke in neutral or as an anti-air as well.
With this adjustment, we have added follow-up hitboxes to certain moves that only activate when the opponent takes damage or blocks. The aim is to have a way to improve the stability of combos while minimizing the effect on neutral. This makes the conditions for combos and strings clear, without making major changes to moves’ properties in neutral.
For Close Slash, we have changed part of the high altitude hitboxes to follow-up hitboxes.
This makes it harder to use Close Slash as an anti-air.
Close Slash had different anti-air potential for each character, and it resulted in very high reward upon a successful anti-air. This adjustment helps it match the intended role of the move.
We have revised the command inputs for Psych Burst and Deflect Shield.
Previously, Deflect Shield would sometimes activate unintentionally when attempting to perform a Throw.
This change aims to prevent accidental inputs, making the intent behind the input clear.
Psych Burst: D+S or D+HS
Deflect Shield: ←+D+P or ←+D+K (direction can be ↙ or ↖)
Setting clearly distinct commands also makes it more consistent to input when a fast reaction is required.
We are also aware that players used to the original controls will need to adjust their sense for the inputs. We have decided on this change out of consideration for the button placement on various controllers and how it could interact with defensive actions.
We will keep track of the changes in the actual match environment as we consider future battle balance adjustments.
We have revised the input buffer upon wakeup so that Blue Psych Burst will not activate if the input is performed within 4 frames directly before wakeup.
If you input Psych Burst during this time window, you will perform a Gold Psych Burst directly upon wakeup.
This change makes it more consistent to perform a Gold Psych Burst as an option on wakeup.
On the other hand, we have decreased the knockback distance of Psych Burst on block, regardless of the situation during activation. This creates less distance with the opponent, making it more likely for the offensive and defensive turns to switch.
These adjustments intend to make it more consistent to perform, without greatly increasing the benefit. This follows a more defined balance of risk and reward when it comes to the offensive and defensive sides using Psych Burst.
Purple Roman Cancel works as a way to create advantageous situations while limiting the opponent’s ability to punish you. However, it made it possible to deal extremely high damage upon a successful read from an advantageous situation, forcing the defending player to make highly risky choices.
We have adjusted it so that when Purple Roman Cancel is used while the opponent is not taking damage, damage proration is applied for a set duration afterwards.
This proration does not apply in situations where the opponent is already taking damage, such as during combos.
This limits the damage possible when using Purple Roman Cancel to set up frame traps or mixup, but it still functions as a means to create an advantageous situation as it did before.
When used with Tension gauge accumulated, Throw was not only an effective defensive option, but also could create situations where the opponent is forced to deal with your offense as it could be made safe with Purple Roman Cancel.
These adjustments now make it impossible to Roman Cancel a Throw on whiff, to introduce risk for the player using the Throw.
This makes a clearer division for when offensive and defensive turns switch.
Throw tech also had a very brief time from activation until it was possible to move again at very close range, making it challenging to assess the situation after a throw tech.
We have extended the screen freeze and added distance after the tech to create a better reset to neutral.
In addition to these changes, command grabs no longer have throw invincibility. Previously, their throw invincibility made them function as frame traps as well.
As with normal throws, they can no longer be covered with Purple Roman Cancel on whiff.
We have re-assessed the risk and reward of various actions with invincibility.
For invincible special moves, we have adjusted the situation on hit and block, while maintaining their role as reversals.
We have adjusted the blowback and recovery of invincible moves that could lead into okizeme on hit, so that they now return you to neutral.
They are also now easier to punish when blocked.
We have also adjusted the mechanics for invincible Overdrives.
They cannot be Roman Canceled, like invincible special moves, and leave you vulnerable to counter hits during the recovery.
They can now no longer be Roman Canceled on hit, making it challenging to deal major damage after an invincible move.
Backdash is also a type of invincible action, so it can no longer be Roman Canceled.
Previously, some strings used Blue Roman Cancel after backdash. We have made it no longer possible to Roman Cancel to manage situations where using invincibility to evade attacks could lead to high rewards.
We have revised the input mechanics for Faultless Defense.
Previously, inputting 2 attack buttons simultaneously when you had no Tension gauge would perform an unintended normal move instead of Faultless Defense.
With these adjustments, inputting Faultless Defense will now result in the blocking animation, even when you have no Tension gauge.
When you have no Tension gauge, it will not result in the additional knockback and chip damage nullification unique to Faultless Defense.
In certain instances where activation could be delayed using Faultless Defense, such as the forced end of Nagoriyuki’s Blood Rage and A.B.A’s Jealous Rage, the mechanics have been adjusted so they can no longer be delayed.
Previously, it was possible for characters with powerful mixup to maintain their offense in a way that was very challenging to handle for the defender after triggering wall stick when the defender was taking damage on the ground.
We have made adjustments so that even if wall stick is triggered with grounded damage, they perform a tech the same as if the wall stick was triggered with aerial damage.
We have also revised the mechanics for Positive Bonus.
There is a penalty making players gain less Tension gauge for a set duration after using an Overdrive or Roman Cancel. Previously, this penalty duration was shortened during Positive Bonus. The shortened duration no longer applies as of this adjustment.
This means that the penalty to Tension gauge gain now applies as normal after the affected actions, even during Positive Bonus.
This makes the move chosen to trigger Wall Break an important decision when looking to gain Tension gauge.
Previously, some Crouching Kick attacks could be used to evade attacks due to the low-profile stance they triggered. This created great variation in characters’ abilities to intercept certain strings.
As of this adjustment, the Crouching Kick attacks with low-profile have had their hitboxes extended upward so that they no longer count as low-profile.
We have also revised the damage dealt by attacks that move forward while in a low-profile stance, as they provided high benefit at low risk.
In addition to heavy damage proration, they now have added combo blowback proration to make it harder to extend combos.
These changes aim to even out the outlier situations created by the difference in the characters’ stances.
We have re-evaluated damage proration for moves that are easy to connect with and can begin combos.
Previously, it was possible to deal major damage from moves that are relatively easy to hit with.
With these changes, we have set high damage proration for such moves to limit the benefit from them.
This applies to the following types of normal and special moves:
- Lunging special moves
- Overhead special moves
- Projectiles
- Standing Punch, Crouching Punch
- Low profile lunging moves
Previously, there was a difference in the startup speed of the fastest attack for different characters. There was a great difference between characters with a 4 frame startup move and those without when it came to punishing or interrupting the opponent successfully.
In order to align the conditions for success in these situations, we have set the fastest move for all characters to 5 frames.
Aligning the startup frames creates a clearer baseline for decision making when it comes to punishing and interrupting.
We have revised the timing when →+P enters a low-profile stance.
Previously, different characters’ →+P attacks would enter a low-profile stance at different frames. This meant that only some characters could interrupt certain strings.
We have made adjustments to unify these conditions, making it so that all characters start with a slightly reduced upper hurtbox as of frame 1, and the hurtbox shrinks to its smallest size at frame 4.
This makes your ability to interrupt strings less dependent on the character.
Previously, damage would increase by 10% upon counter hit.
This would further increase by 20% when the R.I.S.C. Level was at max, and could lead to extremely high damage in certain situations when combined with the lowered defenses.
With these adjustments, we have removed the damage modifier upon counter hit. This limits the upper potential of combos starting from counter hits.
counter hits still trigger the slow-down effect, meaning they still provide benefit in turns of hit confirming and choosing your next attack.
This change aims to make it still valuable to hit, while keeping the potential damage within an appropriate range.
We have re-evaluated the conditions for successful charge commands.
Previously, charge commands required 30 frames of charge time. We have adjusted it so that they require 25 frames instead.
This makes it easier to perform charge moves after a single poke or an action using a → input, with smoother controls.
| Update Details | |
|---|---|
| Wild Assault | Removed. |
| Counter Blitz | Added. |
| Hurtbox |
Changed the hurtbox during hitstun and blockstun. Changed the hurtbox during forward dash, stopping from a dash, backdash, and air dash. Hurtboxes have been unified into two standard sizes, and adjusted to match their respective standards. |
| Follow-up Hitbox |
Added a new hitbox that only hits opponents during hitstun or blockstun. Note that the follow-up hitbox does not hit when attacking your own Servant (Jack-O') or Ball (Venom). |
| Psych Burst |
Command changed to D+S or D+HS. Reduced the knockback of Gold Psych Burst. Blue Psych Burst will no longer activate during the 4F immediately preceding wake-up. |
| Deflect Shield |
Command changed to ←+D+P or ←+D+K. Deflect Shield can no longer be activated while Deflect Shield is active. The first 2F of ground and air throws can now be canceled into Deflect Shield. |
| Purple Roman Cancel | Reduced damage and Tension Gauge gain for 60F when activating Purple Roman Cancel while the opponent is not taking damage. This scaling does not apply in situations where damage is already being dealt, such as during combos. |
| All Throws | Can no longer Roman Cancel on whiff. |
| Throw Clash |
Increased the separation distance upon activation. Recovery changed from 30F → 40F. |
| Backdash |
Can no longer Roman Cancel. Added "PUNISH" text when taking damage during the action. |
| Faultless Defense |
Added a blocking pose even when the Tension Gauge is empty. Changed the visual effect when blocking during Faultless Defense. |
| Wall Stick | Added the ability to tech from a grounded wall stick in the same way as an aerial wall stick. |
| Positive Bonus | Tension Penalty state duration is no longer reduced. |
| Lunging Attacks |
Base damage scaling changed from 80% → 70%. Moves with additional properties beyond forward movement already have heavy base damage scaling and are excluded, such as: |
| Low Profile Property Lunging Attacks |
Changed base damage scaling. Increased combo blowback scaling when hitting as the first hit in a combo. The following moves are affected: ■ Base damage scaling 90% → 60% ■ Base damage scaling 80% → 60% |
| Overhead Special Moves (Excluding Jumping Attacks) | Base damage scaling changed from 80% → 70%. Increased combo blowback scaling when hitting as the first hit in a combo. |
| Projectiles |
Base damage scaling changed from 80% → 60%. Moves with invincible or armor properties in addition to the projectile property already have heavy base damage scaling and are excluded. |
| Standing P / Crouching P | Base damage scaling changed from 80% → 60%. Standing K for Sol, Chipp, and Millia, which were previously treated with the same damage scaling, have been changed similarly. |
| Counter Hit |
Removed the mechanic that increased the damage of the move causing a Counter Hit by 10%. Note that Slayer's Bloodsucking Universe has a mechanic that increases the damage of the move causing a Counter Hit by 20%, but |
| Wall Bounce | The strength of the wall bounce is now affected by combo blowback scaling. The wall bounce becomes weaker later in combos when combo blowback scaling is higher. |
| R.I.S.C. Level |
The value at which the gauge turns red changed from 80% → 75%. When the R.I.S.C. Level reaches 75% or higher, Tension Gauge gain increases. |
| Jump | Added a "PUNISH" text when taking damage during jump startup. |
| Landing Recovery |
Fixed an issue making it possible to cancel landing recovery with another action when landing exactly at the same time as a superflash for moves with landing recovery. Fixed an issue making it possible to block or a Throw Clash at the exact moment of landing for certain moves and actions that incur landing recovery after a mid-air action. |
| Projectiles |
Removed the influence of proximity requirements on projectile clashes. |
| Tension Gauge and Burst Gauge |
Tension Gauge and Burst Gauge gain no longer increases once combo blowback scaling exceeds a certain amount. |
| Guard Crush | Throws that can connect during combos no longer hit opponents who are in Guard Crush. |
Click Icon


For Sol, we have reassessed the overall structure of his combos, making adjustments to limit the maximum potential reward from midscreen combos.
In combination with these changes, we have added his new move Sidewinder Ignited to act as a combo finisher.
Given the limited reward he gets from combos now, we have expanded the breadth of options he has in neutral.
We have removed some of his powerful mixup strings, determining that they did not align with Sol’s offensive game based on close range strike/throw mixup.
Sidewinder Ignited is a new move, available as a follow-up after the HS version of Volcanic Viper.
It works well as the last attack in a combo, as it knocks the opponent down on hit.
It has the Clean Hit property, dealing high damage when it hits in the correct position.
It also triggers wall bounce in the corner on a Clean Hit, making it possible to continue your combo if it hits early on in the combo.
To align with this addition, we have removed the Clean Hit property from the HS version of Volcanic Viper.
We have sped up the startup of Gun Flame and added an extra flame pillar, extending its range.
Each flame pillar has shorter active time individually, which means it reaches its maximum range faster.
It has worse frame advantage now, making it weaker when the opponent blocks it at close range, but it instead works better as a mid-range poke.
Gun Flame (Feint) now moves forward slightly on activation.
This makes it possible to maintain your offense from closer range than before if you catch the opponent by surprise.
Fafnir made it possible to extend combos midscreen too much, so we have revised its properties.
We have removed the wall bounce effect, changing it to tumbling knockdown.
This makes it possible to follow up only after a Clean Hit near the corner, and not when midscreen.
The adjustments to Bandit Revolver and Jumping P have made the powerful blockstring Bandit Revolver → Red Roman Cancel → Jumping P → Jumping P no longer possible.
This string was highly effective at mixup and lead to high reward, which allowed it to function outside of the scope of Sol’s concept of an offense based around making predictions with strikes and throws.
| Adjustment Details | |
|---|---|
| Standing P | Startup changed from 4F → 5F. |
| → + P | ▼Hitbox adjustment Changed the timing when the upper hurtbox is smallest from 3F → 4F. |
| Crouching K | Startup changed from 5F → 6F. |
| Close Standing S | ▼Hitbox adjustment Changed attack hitboxes above a certain height into follow-up hitboxes. |
| Crouching S | Reduced knockback on hit. |
| Jumping P | Startup changed from 5F → 6F. |
| Gun Flame ↓ ↘ → + P |
Startup changed from 18F → 16F. Number of fire pillars changed from 4 → 5. |
| Gun Flame Feint ↓ ↙ ← + P |
Now moves forward during the action. |
| Volcanic Viper (S Versions) → ↓ ↘ + S (Air OK) |
Counter hit effect removed. |
| Volcanic Viper (Ground S Version) → ↓ ↘ + S |
Landing recovery changed from 10F → 22F. Frame advantage on hit changed from +17F → +5F, and frame advantage on block changed from -28F → -40F. |
| Volcanic Viper (HS Versions) → ↓ ↘ + HS (Air OK) |
Can now be followed up with Sidewinder - Ignited. Removed the Clean Hit property. Damage of the second hit changed from 40 → 50. |
| Volcanic Viper (Ground HS Version) → ↓ ↘ + HS |
Startup changed from 13F → 14F. Reduced upward movement speed. ▼Blowback adjustment |
| Volcanic Viper (Air HS Version) → ↓ ↘ + HS in mid-air |
Made it harder to carry momentum. Reduced forward movement speed. ▼Blowback adjustment |
| Sidewinder - Ignited → + HS after Volcanic Viper (HS Versions) |
Added. |
| Bandit Revolver (Ground) ↓ ↘ → + K |
Reduced upward movement speed. Landing recovery changed from 12F → 13F. |
| Bandit Bringer (All Versions) ↓ ↙ ← + K (Air OK) |
▼Hitbox adjustment Added a proximity requirement preventing it from hitting an opponent located behind the character's own pushbox. |
| Bandit Bringer (Ground) ↓ ↙ ← + K |
Reduced knockback. |
| Wild Throw → ↓ ↘ + K |
Removed throw invincibility. |
| Fafnir ← ↙ ↓ ↘ → + HS |
▼Blowback adjustment The opponent will now tech upon landing. Removed the wall bounce effect on Clean Hit and added tumble effect. |
| Tyrant Rave → ↘ ↓ ↙ ← → + HS |
The character is in a counter hit state until the end of the recovery. Can no longer Roman Cancel. Clean Hit no longer occurs when hitting as the first hit in a combo. |

Ky has a new move, Lightning Strike, and has received adjustments to help him benefit from making decisions based on the situation in battle and making accurate predictions while fighting with projectiles.
On the other hand, moves such as his S attacks and Stun Dipper, which were challenging to counter in neutral, have been tuned down.
Lightning Strike creates a bolt of lightning in the position of another projectile, such as Stun Edge.
This can hit the opponent when they attempt to jump over or cross under your projectiles.
You can use this to limit the opponent’s movements by switching up between making the opponent simply block the projectile or following up with Lightning Strike.
By activating it after confirming a Stun Edge hit, you can close distance while applying Shock State.
Far S and Crouching S had fast recovery despite their long range, making them extremely safe options in neutral.
With these adjustments, we have revised the balance between risk and reward by extending the recovery.
It will now be crucial to make decisions as to the use of projectiles with Stun Edge and Lightning Strike.
The changes to damage and combo blowback proration for low profile moves apply to Stun Dipper, thus reducing the damage it can lead into in combos as well as its ability to launch the opponent.
It is also harder to benefit from confirming it has been blocked and using Purple Roman Cancel to maintain your offense, due to the damage proration added to the Purple Roman Cancel mechanic.
| Adjustment Details | |
|---|---|
| Air Backdash | ▼Hitbox adjustment Expanded hurtbox. Adjustments were made because Ky's air backdash hurtbox was extremely small compared to other characters. |
| Close Standing S | ▼Hitbox adjustment Changed attack hitboxes above a certain height into follow-up hitboxes. |
| Far Standing S | Recovery changed from 16F → 20F. Frame advantage on block changed from -5F → -9F. |
| Crouching S | Recovery changed from 20F → 24F. Frame advantage on block changed from -8F → -12F. |
| Stun Edge ↓ ↘ → + S |
Can now be followed up with Lightning Strike. ▼Blowback adjustment |
| Charged Stun Edge ↓ ↘ → + HS |
Can now be followed up with Lightning Strike. ▼Hitbox adjustment |
| Charged Stun Edge (During Dragon Install) ↓ ↘ → + HS |
Hitstop changed from 15F → 11F. Frame advantage on block at point-blank range changed from +82F → +62F. |
| Lightning Strike ↓ ↙ ← + P while Stun Edge active |
Added. |
| Stun Dipper ↓ ↘ → + K |
▼Hitbox adjustment Added a follow-up hitbox to the upper part of the second hit's hitbox. |
| Foudre Arc (During Dragon Install) ↓ ↙ ← + K |
Increased knockback on hit for the final hit. |
| Vapor Thrust (S Versions) → ↓ ↘ + S (Air OK) |
Counter hit effect removed. |
| Vapor Thrust (Ground S Version) → ↓ ↘ + S |
Landing recovery changed from 12F → 20F. ▼Blowback adjustment |
| Vapor Thrust (Ground S Version) (During Shock State) → ↓ ↘ + S (Air OK) |
▼Blowback adjustment Decreased launch height. |
| Ride the Lightning (All Versions) → ↘ ↓ ↙ ← → + HS (Air OK) |
The character is in a counter hit state until the end of the recovery. Can no longer Roman Cancel. |

We have revised the properties of Mr. Dolphin (Vertical), which did not see much use in neutral, to make it more viable.
On the other hand, moves such as ↘+K that could easily catch the opponent or Standing HS that was highly rewarding and challenging to counter have been toned down.
The S version of Mr. Dolphin (Vertical) covers more horizontal movement distance, making it easier to land from a similar range as Far S or Crouching S.
It now triggers additional knockback, making it harder to use to approach by making the opponent block it. Instead, it now functions as a new offensive option.
The HS version of Mr. Dolphin (Vertical) now gains additional travel distance when performed outside of a certain range from the opponent.
As it can only be performed from a set range and has slow startup that makes it easy to react to, we have adjusted it so that May lands at a closer position compared to the S version of Mr. Dolphin (Vertical) when it is blocked.
We have adjusted the S version of Mr. Dolphin (Horizontal) so that May lands faster on hit, creating a situation where she has an advantage.
In exchange, it leaves her at a greater disadvantage than before when blocked, and does not trigger stagger on counter hit.
However, it is affected by the universal change that makes charge inputs faster, making it easier to land at the intended range.
We have added a proximity requirement to ↘+K.
This makes it no longer possible to hit the opponent at the edge of their hurtbox, meaning you must approach in order to hit with this attack.
Due to the effect of the changes to damage and combo blowback for low profile moves, it is also harder to extend your combo by Roman Canceling it on hit.
Standing HS was a hard move to counter, leading to high reward on counter hit despite having fast recovery.
With these adjustments, we have increased the recovery and made it easier for the opponent to whiff punish it.
| Adjustment Details | |
|---|---|
| Standing P | Startup changed from 4F → 5F. |
| Crouching K | ▼Hitbox adjustment Expanded hurtbox upward. |
| ↘ + K | ▼Hitbox adjustment Added a horizontal proximity requirement. |
| Close Standing S | ▼Hitbox adjustment Changed attack hitboxes above a certain height into follow-up hitboxes. |
| Standing HS | Recovery changed from 15F → 23F. Frame advantage on block changed from -4F → -12F. |
| Sweep | ▼Hitbox adjustment Expanded hurtbox upward. |
| Mr. Dolphin (Horizontal) (All Versions) ← (Hold) → + S or HS |
Charge time changed from 30F → 25F. ▼Hitbox adjustment |
| Mr. Dolphin (Horizontal) (S Version) ← (Hold) → + S |
Reduced knockback on hit. Removed the stagger effect on counter hit. Increased upward movement speed on block. Reduced upward movement speed on hit. ▼Blowback adjustment ▼Hitbox adjustment |
| Mr. Dolphin (Horizontal) (HS Version) ← (Hold) → + HS |
Reduced knockback. |
| Mr. Dolphin (Vertical) (All Versions) ↓ (Hold) ↑ + S or HS |
Charge time changed from 30F → 25F. Removed the mechanic that changed movement speed by holding P. Changed the descending part to a mid attack. ▼Hitbox adjustment |
| Mr. Dolphin (Vertical) (S Version) ↓ (Hold) ↑ + S |
Increased knockback. Increased forward movement speed. |
| Mr. Dolphin (Vertical) (HS Version) ↓ (Hold) ↑ + HS |
When the distance from the opponent is above a certain amount, forward movement speed now increases depending on the distance. Reduced knockback on hit for the descending part. |
| Overhead Kiss → ↓ ↘ + K |
Removed throw invincibility. |
| The Wonderful and Dynamic Goshogawara (All Versions) → ↘ ↓ ↙ ← → + HS (Air OK) |
The character is in a counter hit state until the end of the recovery. Can no longer Roman Cancel. |

We have reevaluated the mechanics of Winter Mantis, which was not commonly used in neutral or in strings, to make it more viable.
We have also adjusted Sickle Flash and Whistling Wind to give them more utility in neutral.
On the other hand, we have adjusted the hurtbox of Crouching K which was a very powerful defensive tool, as well as the blowback of →+K to limit the damage it can lead to in combos.
Winter Mantis now functions as a low strike attack, rather than a command grab.
With the change to a strike attack, it now has shorter recovery and can work as a poke at long range.
When it hits in a combo, it draws the opponent in like it has previously, and it is possible to continue attacking.
We have reduced the recovery of Sickle Flash, as the reward on hit or block did not counterbalance the risk from how vulnerable it left Axl.
We have greatly increased the projectile speed of the charged version of Whistling Wind, and decreased the active frames.
They both are now viable means of limiting the opponent’s movement and creating an opportunity to approach.
As a result of the universal changes, the hurtbox of Crouching K no longer enters an extremely low stance.
While this move was crucial to Axl’s defensive game, we have removed the low profile trait given his concept as a far-range character.
→+K does not launch the opponent as high on a grounded hit as before.
This makes it no longer possible to combo from Crouching K to →+K into Winter Mantis.
Sickle Flash still connects as a combo, however, so it is still possible to combo off of Crouching K.
The start of →+K now has a larger hitbox below, allowing it to hit all characters even if they are crouching.
| Adjustment Details | |
|---|---|
| Crouching K | ▼Hitbox adjustment Expanded hurtbox upward. |
| → + K |
▼Blowback adjustment ▼Hitbox adjustment |
| Close Standing S | ▼Hitbox adjustment Changed attack hitboxes above a certain height into follow-up hitboxes. |
| Crouching HS | Damage of the first half of the active frames changed from 45 → 35. Damage of the second half of the active frames changed from 67 → 52. |
| → + HS |
Changed to a mid attack. Startup changed from 27F → 23F. Base damage scaling changed from 80% → 90%. Decreased combo blowback scaling when hitting as the first hit in a combo. Reduced knockback for the second half of the active frames. ▼Hitbox adjustment |
| Sickle Flash ↓ ↘ → + S |
Recovery changed from 26F → 20F. Frame advantage on block at point-blank range changed from -19F → -13F. |
| Soaring Chain Strike ↑ during Sickle Flash |
Hitstop applied to the opponent on block changed from 14F → 18F. |
| Spinning Chain Strike ↓ (Hold OK) during Sickle Flash |
Strengthened vacuum effect. Now pulls the opponent in when hitting with any part other than the final hit. Increased knockback of the final hit. |
| Winter Mantis ← ↙ ↓ ↘ → + HS |
Changed to a low physical attack. Recovery changed from 34F → 15F. ▼Blowback adjustment |
| Snail (Ground) ↓ ↙ ← + HS |
Reduced knockback. |
| Snail (Mid-air) ↓ ↙ ← + HS in mid-air |
▼Blowback adjustment Removed ground bounce effect. |
| Whistling Wind ↓ ↙ ← + K |
▼Blowback adjustment Decreased launch height. |
| Whistling Wind (Hold Version) ↓ ↙ ← + K (Hold) |
Active frames changed from 119F → 59F. Increased the projectile's movement speed when the distance from the opponent is above a certain amount. |
| Sickle Storm | The character is in a counter hit state until the end of the recovery. Can no longer Roman Cancel. |

We have adjusted Alpha Blade (Horizontal), which was not used as often, so that it can now be followed up by Alpha Blade (Diagonal).
This expands his options in neutral, combos, and blockstrings.
On the other hand, we have adjusted the blowback of Alpha Blade (Diagonal), making it harder to extend combos from midscreen for corner carry.
We have also adjusted the recovery and active time of the rope from Tightrope to make it easier for the opponent to deal with.
Alpha Blade (Horizontal) has been adjusted with faster startup, so it can now combo after Standing HS.
However, the faster startup makes it more challenging to land as a crossup.
It can now be followed up by Alpha Blade (Diagonal) on hit or block.
The follow-up version has different properties than when performed on its own.
The follow-up version of Alpha Blade (Diagonal) can also transition into Tightrope Run, creating more offensive options using Tightrope.
We have adjusted the blowback of grounded Alpha Blade (Diagonal), making it less viable mid-combo.
This makes it harder to carry the opponent from midscreen into the corner all at once, but it will combo into Aerial Alpha Blade (Horizontal) on aerial hit, creating an opportunity for a knockdown and okizeme.
Due to the retreating movement as Chipp sets up Tightrope, it would make it challenging for the opponent to punish due to the distance.
We have increased the recovery, giving more time for the opponent to run in and punish it.
The Tightrope also remains for a shorter duration, limiting the length of time the opponent needs to deal with Chipp’s pressure.
| Adjustment Details | |
|---|---|
| Standing P | Startup changed from 4F → 5F. |
| → + P | ▼Hitbox adjustment Changed the timing when the upper hurtbox is smallest from 3F → 4F. |
| Close Standing S | ▼Hitbox adjustment Changed attack hitboxes above a certain height into follow-up hitboxes. |
| Crouching S | Can no longer be canceled into Crouching HS on whiff. |
| Alpha Blade (Horizontal) (All Versions) ↓ ↘ → + P (Air OK) |
Can now be followed up with Alpha Blade (Diagonal). Removed the slight knockback that occurred when the projectile touched something. |
| Alpha Blade (Diagonal) (All Versions) ↓ ↘ → + K (Air OK) |
The properties now change when activated as a follow-up from Alpha Blade (Horizontal). |
| Alpha Blade (Diagonal) (Ground) ↓ ↘ → + K |
▼Blowback adjustment Increased horizontal blowback on air hit. Decreased launch height on air hit. |
| Beta Blade (All Versions) → ↓ ↘ + S (Air OK) |
Counter hit effect removed. |
| Beta Blade (Ground) → ↓ ↘ + S |
Landing recovery changed from 8F → 21F. Frame advantage on hit changed from +17F → +4F, and frame advantage on block changed from -27F → -40F. |
| Rokusai ↓ ↘ → + S during Resshou |
Reduced knockback. |
| Wall Run Hold → while dashing near the corner |
Removed the slight knockback that occurred when the projectile touched something. The hitbox of Alpha Blade (Horizontal) no longer disappears when transitioning to Wall Run from Alpha Blade (Horizontal). |
| Wall Run Attack P during Wall Run |
Damage changed from 31 → 26. |
| Wall Run Attack K during Wall Run |
Damage changed from 28 → 24. |
| Wall Run Attack Close S during Wall Run |
Damage changed from 45 → 38. |
| Wall Run Attack Far S during Wall Run |
Damage changed from 36 → 30. |
| Wall Run Attack HS during Wall Run |
Damage changed from 50 → 42. |
| Wall Run Attack → + HS during Wall Run |
Damage changed from 72 → 50. |
| Tightrope Run |
Recovery changed from 37F → 44F. Duration of the rope changed from 360F → 270F. |
| Tightrope Run Attack P during Tightrope Run |
Damage changed from 31 → 26. |
| Tightrope Run Attack K during Tightrope Run |
Damage changed from 28 → 24. |
| Tightrope Run Attack Close S during Tightrope Run |
Damage changed from 45 → 38. |
| Tightrope Run Attack Far S during Tightrope Run |
Damage changed from 36 → 30. |
| Tightrope Run Attack HS during Tightrope Run |
Damage changed from 50 → 42. |
| Tightrope Run Attack → + HS during Tightrope Run |
Damage changed from 60 → 50. |

We have toned down his moves that gave him a heavy advantage against long-range characters, making it more challenging for him to quickly close distance with the opponent.
In exchange, he can effectively pressure the opponent slowly by walking.
F.D.B. now decreases the active frames of projectiles it reflects, and they cause a soft knockdown on hit.
This makes it harder for Potemkin to close the distance after reflecting a projectile, on both hit and block.
The projectile from Giganter Kai also has decreased active frames, making strategies involving approaching with a projectile in front more challenging to pull off.
Hammer Fall can no longer endure low attacks.
It was a powerful option to force an approach at the cost of Tension gauge, but it now must be used with caution as it leaves you vulnerable to a counter hit if the opponent uses a low.
Potemkin Buster can no longer endure attacks.
This is because the risk did not balance out the reward, as it was a potent means of intercepting attacks from a slight distance and dealing incredibly high damage.
As throws can no longer be Roman Canceled, it is more risky to go for and leads to less reward potential due to the damage proration from Purple Roman Cancel.
His forward walk now moves faster.
While he now struggles to force an approach using Tension Gauge, he can approach more successfully by walking forward than before.
→+HS now moves forward slightly before the attack comes out, extending the range.
This expands his options at long range, as it can hit from outside the range of Standing HS.
| Adjustment Details | |
|---|---|
| Forward Walk | Increased movement speed. |
| Close Standing S | ▼Hitbox adjustment Changed attack hitboxes above a certain height into follow-up hitboxes. |
| Crouching S | ▼Hitbox adjustment Expanded hitbox and hurtbox downward. |
| Standing HS |
Now launches the opponent on ground hit. ▼Blowback adjustment |
| → + HS |
Now moves forward during the action. Damage changed from 80 → 65. Active frames changed from 5F → 7F. |
| Jumping D | ▼Hitbox adjustment Expanded hurtbox downward. |
| Potemkin Buster → ↘ ↓ ↙ ← → + P |
Removed the ability to withstand an attack. Removed throw invincibility. |
| Slide Head ↓ ↘ → + S |
Changed the startup animation. This is a visual change only, and does not affect the attack properties or hurtbox. |
| Hammer Fall ← (Hold) → + HS |
Charge time changed from 30F → 25F. Removed the ability to withstand low attacks. No longer turns to face the opponent when withstanding an attack. |
| Hammer Fall Break P during Hammer Fall |
Removed the ability to withstand low attacks. |
| Projectiles reflected by F.D.B. |
Now transitions into the same explosion as a hit 30F after startup. The explosion now occurs closer than before. Hitstop of the explosion part changed from 15F → 7F. ▼Blowback adjustment |
| Heavenly Potemkin Buster → ↘ ↓ ↙ ← → + S |
The character is in a counter hit state until the end of the recovery. Can no longer Roman Cancel. |
| Giganter Kai → ↘ ↓ ↙ ← → + HS |
Active frames changed from 465F → 105F. Increased the projectile's movement speed. |

We have adjusted his command movement and Afro state to tone them down, as they were challenging for the opponent to counter.
In exchange, some items can now be obtained mid-air, making W-W-What Could This Be? more viable. It is easier to act in tandem with items now.
The Donut, Banana, Afro, and Trumpet items can now be obtained while mid-air.
In addition to the health recovery, the Donut item now also recovers Tension gauge.
The Trumpet is now tossed in a position closer to Faust, making it easier for him to obtain it.
Faust gains access to powerful neutral and strings after obtaining the trumpet, giving him more opportunities for him to gain an advantage.
W-W-What Could This Be? has decreased recovery, and it is possible to stock items by holding the input like with What Could This Be?
This opens up potential for major benefit after knocking the opponent down, as you can both stock and toss items at the same time.
It is now possible to halt the move by pressing S during Mix Mix Mix on hit or block.
You can choose to stop while the opponent is stuck to the wall and trigger Wall Break with an attack of your choice.
Bone-Crushing Excitement had especially slow startup among invincible Overdrives, so we have sped up the startup to make it more viable.
Despite the improvement, it is still on the slower end.
While the opponent is in the Afro state, the attack would activate even if Faust took damage when setting it on fire with Jumping D or another move. However, as this made it possible to keep the opponent locked down for an extended time, the attack no longer activates if Faust takes damage.
We have adjusted Faust’s hurtbox to longer shrink low during the ↙ direction command movement.
Previously, there were very few countermeasures against his command movement, as it was possible to evade attacks just by crouch blocking.
On the other hand, movement in the ↘ direction remains low-profile as before.
Going forward, players will need to avoid attacks while taking on the risk of being unable to block.
| Adjustment Details | |
|---|---|
| Crouching P | ▼Hitbox adjustment Expanded hurtbox upward. |
| Crouching K | ▼Hitbox adjustment Expanded hurtbox upward. |
| Close Standing S | ▼Hitbox adjustment Changed attack hitboxes above a certain height into follow-up hitboxes. |
| Command Movement ↙ or ↘ |
▼Hitbox adjustment Expanded hurtbox upward during ↙ input. |
| Mix Mix Mix (All Versions) ↓ ↘ → + S (Air OK) |
The animation can now be interrupted with S when touching the opponent. |
| Snip Snip Snip ↓ ↘ → + HS |
Removed throw invincibility. |
| Love ↓ ↘ → + P in mid-air |
▼Blowback adjustment |
| Donut | Can now be acquired while falling. Added an effect that recovers the Tension Gauge upon acquisition. |
| Banana | Can now be acquired while falling. Note that the Banana Peel cannot be acquired. |
| Afro |
Can now be acquired while falling. Acquiring an Afro while already in the Afro state now extends the duration. If Faust enters a hitstun state after the Afro is ignited by a fire-attribute attack such as Jump D, the burning Afro now disappears. Fixed an issue causing the Burst Gauge to increase when the opponent wall sticks from the Afro explosion. |
| Trumpet |
Can now be acquired while falling. Reduced forward movement speed. Reduced applied gravity. |
| Bone-crushing Excitement → ↘ ↓ ↙ ← → + HS |
The character is in a counter hit state until the end of the recovery. Can no longer Roman Cancel. Startup changed from 21F → 15F. |
| W-W-What Could This Be? ↓ ↘ → ↓ ↘ → + P (Hold OK) |
Recovery changed from 33F → 27F. The final item can now be stocked by holding P. |

We have made adjustments to limit her combo routes, as she was able to perform highly damaging combos from various starters.
Artemis recovered quickly and was challenging for the opponent to deal with, so we have adjusted it so that Millia is more likely to lose her turn on offense when it is blocked.
In exchange, Standing K and the S version of Tandem Top have improved utility, allowing her to use her excellent mobility to launch her grounded offense.
We have also made Bad Moon more rewarding to hit in combos to give her access to powerful offense after air-to-air attacks.
We have reduced the knockback of Standing K.
When approaching with a dash, it can combo into Sweep even after multiple hits, making it easier to confirm off of.
We have adjusted the launch on hit after the S version of Tandem Top, making it harder to relaunch the opponent when used mid-combo.
On the other hand, we have reduced the horizontal blowback, allowing for Millia to continue her offense at a greater advantage on hit.
The projectile also moves faster now, making it viable as a long-range poke.
Bad Moon now gains different properties when used at a high altitude, causing a hard knockdown that cannot be teched.
Millia has enough time with an advantage to go in and hit with a meaty Close S or perform an instant air dash before attacking.
This makes it more rewarding to successfully land an air-to-air.
We have adjusted the launch of Iron Savior on grounded hit, reducing the buffer time for following it up.
It is no longer possible to perform long combos off of counter hit poke starters, such as a counter hit Far S into Mirazh and then Iron Savior.
Artemis now descends at a slower speed and has additional landing recovery.
Millia now loses her turn when it is blocked, putting her at risk of getting punished if it is blocked at close range.
Along with the additional recovery, the blowback on hit has been adjusted, making it still possible to combo off of on hit.
| Adjustment Details | |
|---|---|
| Crouching P | Startup changed from 4F → 5F. |
| → + P | ▼Hitbox adjustment Changed the timing when the upper hurtbox is smallest from 3F → 4F. |
| Standing K | Reduced knockback. |
| Crouching K | ▼Hitbox adjustment Expanded hurtbox upward. |
| Close Standing S | ▼Hitbox adjustment Changed attack hitboxes above a certain height into follow-up hitboxes. |
| Crouching S | ▼Hitbox adjustment Expanded hitbox and hurtbox forward. |
| Sweep | ▼Hitbox adjustment Expanded hurtbox upward. |
| Bad Moon ↓ ↘ → + P in mid-air |
▼Blowback adjustment When activated above a certain altitude, grounded opponents can no longer tech on landing from the final hit. When activated above a certain altitude, decreased launch height of the final hit. |
| Tandem Top (S Version) ↓ ↘ → + S |
Increased the projectile's forward movement speed. ▼Blowback adjustment ▼Hitbox adjustment |
| Iron Savior ↓ ↙ ← + P |
The animation now ends when switching positions with the opponent. Counter hit effect removed. ▼Blowback adjustment |
| Mirazh ↓ ↙ ← + K |
▼Hitbox adjustment Expanded hurtbox upward. |
| Lust Shaker ↓ ↙ ← + S |
Recovery changed from 16F → 15F. Increased knockback on block for the final hit. |
| Lust Shaker (Repeated Press Version) ↓ ↙ ← + S (Pressed Repeatedly) |
Recovery changed from 18F → 17F. Damage of the final hit changed from 7 → 9. Reduced knockback on hit for the final hit. ▼Blowback adjustment |
| Lust Shaker (Maximum Press Version) ↓ ↙ ← + S (Maximum Presses) |
Recovery changed from 20F → 19F. Damage of the final hit changed from 7 → 11. Reduced knockback on hit for the final hit. ▼Blowback adjustment |
| Artemis ↓ ↙ ← + HS |
Landing recovery changed from 8F → 14F. ▼Blowback adjustment ▼Hitbox adjustment |
| Winger → ↘ ↓ ↙ ← → + HS |
The character is in a counter hit state until the end of the recovery. Can no longer Roman Cancel. ▼Hitbox adjustment |

We have revised the trajectory of “Float” as it was challenging to use effectively, making it easier now to use Eddie to get the opponent surrounded.
We have also sped up the startup of Invite Hell to help lead into knockdowns off of his central poke, Crouching S, on hit.
In exchange, we have limited the potential reward from combos after a poke counter hit.
As well, it is harder now to maintain offense after Sun Void is blocked, as it could lead into very powerful strings.
We have adjusted the trajectory of “Float,” with the exception of the P version.
The K version sends Eddie up at a high altitude, allowing him to move behind the opponent while at minimal risk of taking an attack.
Invite Hell has faster startup, meaning it can combo after Crouching S hits.
It will also now always appear on-screen, making it more viable in okizeme in the corner.
The second hit of “Pierce” has slower startup, and can no longer combo after a counter hit from Crouching S.
This limits the possible benefit, as it used to be possible to carry the opponent to the corner and trigger Wall Break off of a long-range poke.
Despite the slower startup, we have adjusted other aspects to minimize the effect on block or aerial hit, such as the hitstop, active frames, and launch height.
We have extended the time until Eddie is able to act after Sun Void.
This makes it more likely for Eddie to be destroyed by the opponent punishing it on block, unless you choose to use “Oppose.”
The opponent still needs to watch out for Eddie, but it is more challenging for Zato to transition into mixup now.
| Adjustment Details | |
|---|---|
| Close Standing S | ▼Hitbox adjustment Changed attack hitboxes above a certain height into follow-up hitboxes. |
| Eddie |
When canceling Eddie's actions "Pierce," "That's a lot!", "Leap," or "Oppose," the latter half of the animation can now be canceled into "Float." Fixed an issue causing Eddie to move on his own under certain conditions. |
| "Pierce" ↓ ↘ → + P |
Active frames of the initial hit changed from 3F → 6F. Startup of the second hit changed from 31F → 33F. Damage changed from 23 → 18. Hitstop on block for the initial hit changed from 6F → 8F. ▼Blowback adjustment |
| "That's a lot!" ↓ ↘ → + K |
Damage changed from 22 → 17. |
| "Leap" ↓ ↘ → + S |
Damage of the initial hit changed from 24 → 19. |
| "Oppose" ↓ ↘ → + HS |
Damage changed from 35 → 28. |
| "Float" ↓ ↙ ← + P |
No longer consumes the Eddie Life Gauge during activation. The input buffer window for launching Eddie has been made 5F earlier. Increased Eddie's forward movement speed when launched with K. Increased Eddie's forward movement speed when launched with S. Increased Eddie's forward movement speed when launched with HS. |
| Invite Hell ↓ ↓ + HS |
The projectile now does not extend past the corner. Startup changed from 18F → 16F. Active frames changed from 32F → 34F. Recovery changed from 51F → 49F. |
| Damned Fang → ↓ ↘ + S |
Removed throw invincibility. |
| Drunkard Shade ↓ ↙ ← + S |
▼Blowback adjustment Decreased launch height on counter hit. |
| Sun Void (All Versions) → ↘ ↓ ↙ ← → + S in mid-air |
Increased Eddie's recovery by 3F. |
| Sun Void (Ground) → ↘ ↓ ↙ ← → + S |
Recovery changed from 61F → 65F. Frame advantage on block at point-blank range changed from +2F → -2F. |

We have revised her overall combo structure to limit the potential benefit from combos midscreen.
In exchange, Sabrobato now works better as a combo finisher, and the S version of Bajoneto can work as okizeme, allowing for rewarding situations over time.
Sabrobato has faster startup, and can combo after Standing HS even against a standing opponent.
We have adjusted the damage and situation on hit to match its new versatility.
We have adjusted the knockback and recovery of Ondo to make it more viable in neutral.
It can now be used as a poke when outside the range of Standing HS.
We have removed the wall bounce from the S version of Bajoneto, changing it to trigger hard knockdown where the opponent cannot tech.
It can no longer work mid-combo, however if the sword hits it is now possible for the explosion part to trigger on the opponent’s wakeup. This makes it easy to perform okizeme.
It comes out faster now, making it easier to include in combos with different starters.
We have adjusted the launch height after Dauro and Erarlumo, decreasing the time possible for following them up.
Combined with the changes to the S version of Bajoneto, this makes it more challenging to put together combos that carry into the corner and trigger Wall Break.
We have adjusted the blowback from the sword hit of the HS version of Bajoneto to limit combos with long carry distance.
| Adjustment Details | |
|---|---|
| Crouching K | ▼Hitbox adjustment Expanded hurtbox upward. |
| Close Standing S | ▼Hitbox adjustment Changed attack hitboxes above a certain height into follow-up hitboxes. |
| Far Standing S | ▼Hitbox adjustment Reduced downward hitbox of the greatsword. |
| Standing HS | ▼Hitbox adjustment Reduced downward hitbox and hurtbox. |
| → + HS | ▼Blowback adjustment Reduced horizontal blowback. |
| Sweep | Recovery changed from 34F → 30F. Frame advantage on block changed from -8F → -4F. |
| Jumping K | ▼Blowback adjustment Decreased launch height on air hit. |
| Jumping HS | Landing recovery changed from 9F → 6F. |
| Bajoneto (S Version) ↓ ↘ → + S |
Startup of the sword attack changed from 20F → 15F. Delayed the startup of the explosion attack by 25F. ▼Blowback adjustment |
| Bajoneto (HS Version) ↓ ↘ → + HS |
▼Blowback adjustment Decreased launch height of the sword attack. |
| Dauro → ↓ ↘ + P |
▼Blowback adjustment Reduced horizontal blowback. Decreased launch height. |
| Sabrobato ↓ ↙ ← + HS |
Startup changed from 22F → 21F. ▼Blowback adjustment |
| Erarlumo (1st Hit) ↓ ↙ ← + P |
▼Blowback adjustment Decreased launch height on air hit. |
| Erarlumo (3rd Hit) ← + P while Erarlumo (2nd Hit) |
Reduced Guard Crush duration of the enhanced version. Frame advantage on block changed from -2F → -8F. |
| Ondo ↓ ↘ → + K |
Startup changed from 28F → 27F. Attack Level changed from 2 → 1. Reduced vacuum effect. ▼Blowback adjustment |
| Mortobato ↓ ↘ → ↓ ↘ → + S |
The character is in a counter hit state until the end of the recovery. Can no longer Roman Cancel. |

We have improved his pressure in Brynhildr Stance, by making it possible to jump and perform jumping attacks during the stance.
In exchange for this, we have adjusted the central moves he uses to enter the stance such as Turbulenz, the HS version of Eisensturm, and Standing HS, to make it more challenging for him to enter it.
Inputting ↖/↑/↗ during the Brynhildr Stance will now perform a jump.
You can also perform unique jumping attacks that cover both in front of and behind Leo during this jump.
You can now jump cancel P/K/S attacks during the stance, allowing for tricky offensive options.
It also opens up a new strategy, by approaching with jumping attacks after entering the stance from neutral.
We have reduced the knockback of Turbulenz.
Previously, it was possible to return to neutral relatively safely by backdashing after it was blocked.
It now leaves you at a closer distance when blocked, making it easier for the opponent to punish.
We have increased the recovery of the HS version of Eisensturm.
It was previously possible to enter the stance by making the opponent block the active frames of Turbulenz after a hit, but the active frames will no longer hit meaty, leaving Leo in a less advantageous situation.
However, it has additional horizontal movement now, making it possible to continue okizeme afterwards with Close S.
We have reduced the Attack Level of Standing HS.
Standing HS no longer combos into Turbulenz, making it more challenging to enter the stance mid-combo.
| Adjustment Details | |
|---|---|
| → + P | ▼Hitbox adjustment Changed the timing when the upper hurtbox is smallest from 3F → 4F. |
| Close Standing S | ▼Hitbox adjustment Changed attack hitboxes above a certain height into follow-up hitboxes. |
| Crouching S | ▼Hitbox adjustment Expanded hurtbox upward. |
| Standing HS | Attack Level changed from 4 → 3. Frame advantage on block changed from -8F → -10F. |
| → + HS | ▼Blowback adjustment No longer launches the opponent on ground hit. |
| Sweep |
Made it harder to carry momentum. Reduced forward movement speed. ▼Hitbox adjustment |
| Graviert Würde (All Versions) ← (Hold) → + S or HS |
Charge time changed from 30F → 25F. |
| Eisensturm (All Versions) ↓ (Hold) ↑ + S or HS |
Charge time changed from 30F → 25F. |
| Eisensturm (S Version) ↓ (Hold) ↑ + S |
Counter hit effect removed. Landing recovery changed from 8F → 20F. ▼Blowback adjustment |
| Eisensturm (HS Version) ↓ (Hold) ↑ + HS |
Increased forward movement speed. Landing recovery changed from 12F → 16F. |
| Zweites Kaltes Gestöber ↓ ↘ → + HS |
Fixed an issue causing the recovery to become longer under certain conditions. |
| Turbulenz ↓ ↙ ← + S (Hold OK) |
Reduced knockback on block. Increased knockback on hit. |
| Dash During Brynhildr Stance |
Fixed an issue causing him to move in the opposite direction of the opponent when dashing after the recovery of an attack ends. |
| Jump During Brynhildr Stance |
Added. |
| Jumping Attacks during Brynhildr Stance P or K or S or HS during Brynhildr Stance Jump |
Added. |
| Brynhildr Stance P |
Can now be canceled into a jump during Brynhildr Stance upon touching the opponent. |
| Brynhildr Stance K |
Can now be canceled into a jump during Brynhildr Stance upon touching the opponent. |
| Brynhildr Stance S |
Can now be canceled into a jump during Brynhildr Stance upon touching the opponent. |
| Kahn Schild D during Brynhildr Stance |
Recovery changed from 37F → 40F. If the animation does not transition into the cinematic after withstanding an attack, the recovery is now reduced by 3F. ▼Blowback adjustment |
| Leidenschaft des Dirigenten → ↘ ↓ ↙ ← → + HS |
The character is in a counter hit state until the end of the recovery. Can no longer Roman Cancel. |

Nagoriyuki has a new move, Yukimoyoi, giving him a new option for managing the Blood Gauge.
He now recovers more Blood Gauge when the opponent blocks his HS attacks, allowing him to manage the gauge without using special moves.
We have also revised the decrease in his defenses as the Blood Gauge rises.
While he has more means of managing the gauge now, he faces greater risk when triggering Blood Rage.
His new move Yukimoyoi is a long-range low attack that serves as an option for managing the Blood Gauge.
After activating it, the Blood Gauge is set at Level 3, and will no longer increase or decrease for a set duration.
When the duration ends, the results of the Blood Gauge that would have been gained during this time will take effect all at once.
It is possible to use it just before Blood Rage would activate to delay it, but you will still activate Blood Rage in the end unless you are able to recover enough of the gauge during the effective time.
It can be a highly rewarding move, capable of powering up your normal moves if you are able to predict the upcoming developments in the match.
Standing HS, Crouching HS, and →+HS now recover more Blood Gauge when blocked.
This makes it easier to recover Blood Gauge even after reaching Level 3 when your special moves are restricted.
This change works well with Yukimoyoi, which puts you in Level 3 upon activation.
We have adjusted his defense values as the Blood Gauge rises, reducing the damage taken.
This reduces damage by around 9% when at Level 3 compared to before.
Blood Rage now has longer active frames, making Nagoriyuki lose more health.
This increases the risk if you cannot manage the gauge properly, as it is now easier to handle with the addition of Yukimoyoi and the Blood Gauge recovery from HS attacks.
We have adjusted how Bloodsucking Universe performs regarding the Blood Gauge.
It now recovers less of the gauge on hit, making it more likely to trigger Blood Rage.
| Adjustment Details | |
|---|---|
| Defense |
Defense modifier value when Blood Gauge is at Level 2 changed from 1.01 → 0.98, reducing damage taken. Defense modifier value when Blood Gauge is at Level 3 or during Blood Rage changed from 1.14 → 1.04, reducing damage taken. |
| Close Standing S |
Can now be jump canceled upon touching the opponent. ▼Hitbox adjustment |
| Standing HS |
Startup changed from 18F → 16F when the Blood Gauge is at Level 2. Increased Blood Gauge recovery amount on block. |
| Crouching HS | Increased Blood Gauge recovery amount on block. |
| → + HS | Increased Blood Gauge recovery amount on block. |
| Command Normal 5 S after Command Normal 4 |
Reduced Wall Break value gain. |
| Blood Rage |
Activation can no longer be delayed by using Faultless Defense. Reduced the depletion speed of the Blood Gauge. |
| Yukimoyoi ↓ ↙ ← + S |
Added. |
| Bloodsucking Universe → ↓ ↘ + P |
Removed throw invincibility. Changed the behavior of the Blood Gauge upon success. |
| Wasureyuki → ↘ ↓ ↙ ← → + S |
The character is in a counter hit state until the end of the recovery. Can no longer Roman Cancel. |

We have made minor adjustments to many of her moves, rather than overall major changes.
We have toned down Tempestade, as it was highly rewarding and challenging to counteract.
We also adjusted her hurtboxes, as her standing and crouching hitboxes were positioned lower than the standard.
While powered up, she now maintains the enhanced state for a set duration once the Tension Gauge reaches the 50% and 100% marks.
This means she will no longer immediately lose the power-up even if she uses her Tension Gauge with something like a Roman Cancel right after passing the mark.
She now moves forward slightly during Crouching S.
This both makes it powerful as a low from mid-range in neutral, as well as a more consistent combo into Crouching HS.
We have expanded the upper hitbox and decreased the aerial hurtbox of Sol Nascente.
This makes it work better as an anti-air.
We have decreased the recovery of Sepultura, making it no longer punishable on block.
In exchange, her normal moves cause less knockback, leaving her at closer distance on block and more likely to lose her turn on offense.
Tempestade now has more recovery on block or whiff, leaving Giovanna at a disadvantage on block.
You are now at risk of punishment unless it is used in a situation where it is certain to hit.
We have expanded her upper hurtbox when standing and crouching, as it was positioned lower than other characters.
This makes moves such as I-No’s Chemical Love hit Giovanna as well when she is standing.
| Adjustment Details | |
|---|---|
| Hurtbox |
Expanded hurtbox upward during Standing and Crouching states, as they were lower than the standard for characters in this game. Along with this, the hurtboxes of various normal attacks, special moves, and Overdrive attacks were also expanded upward. |
| Enhanced State | The enhanced state is now maintained for a set period even if the Tension Gauge drops below the 50% or 100% threshold after entering it. |
| Standing P | Startup changed from 4F → 5F. |
| Close Standing S |
▼Hitbox adjustment |
| Crouching S |
Now moves forward during the action. ▼Blowback adjustment |
| Crouching HS | ▼Hitbox adjustment Expanded hitbox and hurtbox forward during the second half of the active frames. |
| Jumping D | Startup of the second hit changed from 17F → 15F. |
| Sepultura ↓ ↙ ← + K |
Recovery changed from 21F → 20F. Reduced knockback on block. |
| Sepultura (Powered-up) ← + K during Chave |
Recovery changed from 21F → 20F. |
| Sol Nascente (All Versions) → ↓ ↘ + S or → + S during Chave |
▼Hitbox adjustment Expanded hitbox upward during startup (frames 7-8). Expanded hitbox backward during the second half of the active frames (frames 11-14). Reduced upward hurtbox from transitioning to the air until the active frames end (frames 9-14). |
| Ventania → ↘ ↓ ↙ ← → + HS |
The character is in a counter hit state until the end of the recovery. Can no longer Roman Cancel. |
| Tempestade ↓ ↘ → ↓ ↘ → + HS in mid-air |
Made it easier for the attacks during the cinematic to hit the opponent when transitioning to the lock-on cinematic on hit. Recovery on block or whiff changed from 10F → 18F. |

We have adjusted Fuujin to function more simply, with the follow-up moves powering up when the button is held.
Crouching HS now moves forward, making it easier to apply offensive pressure with.
On the other hand, we have adjusted his moves to limit his combo potential midscreen.
We have also added special damage proration when Suigetsu No Hakobi hits to prevent it leading into excessive damage.
Fuujin can no longer be canceled into Fuujin, Kou, or Suigetsu No Hakobi when charged.
Instead, the follow-ups now have enhanced properties after the charged version.
We have also revised the properties of the follow-up moves after the standard version of Fuujin.
We have reduced the launch height of Nagiha on hit, making it no longer possible to land highly damaging attacks afterwards.
The enhanced version of Nagiha causes additional knockback, making it harder for the opponent to punish it on block.
The opponent will now tech after Rin hits, meaning okizeme with Close S is no longer possible afterwards.
The enhanced version of Rin causes ground bounce on hit, making it possible to continue attacking if you use Roman Cancel.
Crouching HS now moves forward and causes less knockback.
It leaves Anji closer to the opponent when blocked, making it easier to pressure the opponent with options other than Fuujin.
The changes to Nagiha and Kou make it harder to perform combos from midscreen with major corner carry that lead into Wall Break.
Suigetsu No Hakobi applies special damage proration after enduring an attack, decreasing the damage of combos started afterwards for a set duration.
Previously, it was common to start a combo with Close S afterwards, which led to very high benefits. This damage proration prevents such situations.
| Adjustment Details | |
|---|---|
| Crouching K |
Startup changed from 7F → 6F. ▼Blowback adjustment |
| Close Standing S | ▼Hitbox adjustment Changed attack hitboxes above a certain height into follow-up hitboxes. |
| Crouching S | ▼Hitbox adjustment Expanded hurtbox upward. |
| Standing HS | ▼Blowback adjustment Decreased launch height after ground bounce. |
| Crouching HS |
Now moves forward during the action. Reduced knockback. ▼Blowback adjustment |
| Jumping D | ▼Blowback adjustment Reduced horizontal blowback after wall bounce. Decreased launch height after wall bounce. |
| Fuujin (Hold Version) ↓ ↘ → + HS (Hold) |
Can no longer be canceled into Fuujin, Kou, or Suigetsu No Hakobi. Added stagger effect on hit. The follow-up attacks Nagiha, Rin, and Hari Ichi-shiki are now enhanced. |
| Nagiha S during Fuujin |
▼Blowback adjustment Decreased launch height. |
| Rin HS during Fuujin |
Recovery changed from 24F → 22F. ▼Blowback adjustment |
| Kou ↓ ↘ → + S (Hold OK) |
▼Blowback adjustment Increased vertical combo blowback scaling for the second hit. |
| Suigetsu No Hakobi ↓ ↘ → + K (Hold OK) |
A special damage scaling is now applied for 60F after withstanding an attack. |
| Midare ↓ ↙ ← + P during Suigetsu No Hakobi |
Damage changed from 60 → 40. |
| Kachoufugetsu Kai → ↘ ↓ ↙ ← → + S |
Duration of withstanding attacks changed from 30F → 28F. Recovery changed from 40F → 46F. The character is in a counter hit state until the end of the recovery. |

We have adjusted her air dash to add further variation to her jump-ins, okizeme, and more.
Standing HS has faster startup, and her pokes with S attacks can lead into higher rewards.
On the other hand, it is harder now to extend her combos due to the adjusted blowback from moves such as aerial Chemical Love and Mad Love Agitato.
The K and S versions of Sultry Performance can be punished more easily on block, and provide less reward on hit.
When canceling her air dash into another action, inputting ↓ or ↑ will cause slight movement in the corresponding direction.
Inputting ↑ and Jumping HS during an air dash makes it an effective long-range poke. Inputting ↓ and Jumping P can let her land super fast.
Her Standing HS has faster startup, making it possible to combo into Far S or Crouching S regardless of the opponent’s state.
We have also adjusted the blowback, making it possible to then combo into the HS version of Stroke the Big Tree to score a knockdown.
This improves her neutral game by providing better rewards off of her smaller poke hits.
However, it no longer combos into Mad Love Agitato, making it harder to create highly potent combos.
We have adjusted the blowback of the aerial version of Chemical Love to make it harder to use in combos.
We have made the same change to Mad Love Agitato.
We have toned these moves down as their potential to carry into the corner and trigger Wall Break off of various combo starters was too powerful for an okizeme-centric character.
| Adjustment Details | |
|---|---|
| Air Dash |
The movement distance now changes when inputting ↑ or ↓ at the end of the animation. Increased forward movement speed at the end of the animation. |
| Air Backdash | The movement distance now changes when inputting ↑ or ↓ at the end of the animation. |
| → + P | ▼Hitbox adjustment Changed the timing when the upper hurtbox is smallest from 3F → 4F. |
| Crouching K | ▼Hitbox adjustment Expanded hurtbox upward. |
| Close Standing S | ▼Hitbox adjustment Changed attack hitboxes above a certain height into follow-up hitboxes. |
| Standing HS |
Startup changed from 15F → 14F. ▼Blowback adjustment |
| Crouching HS | ▼Hitbox adjustment Expanded hurtbox upward. |
| → + HS | Recovery changed from 19F → 15F. Frame advantage on block changed from -8F → -4F. |
| Chemical Love (Mid-air) ↓ ↙ ← + K in mid-air |
▼Blowback adjustment Removed wall bounce effect. |
| Mad Love Agitato ↓ ↙ ← + S |
▼Blowback adjustment Decreased launch height. |
| Sultry Performance (K Version) ↓ ↘ → + K in mid-air (Hold OK) |
Removed the mechanic that allowed leaping up with an additional input. Increased knockback on hit for the normal version only. ▼Blowback adjustment ▼Hitbox adjustment |
| Sultry Performance (S Version) ↓ ↘ → + S in mid-air (Hold OK) |
Removed the mechanic that allowed leaping up with an additional input. Increased knockback on hit for the normal version only. The hold version remains unchanged. ▼Blowback adjustment ▼Hitbox adjustment |
| Sultry Performance (HS Version) ↓ ↙ ← + HS in Mid-air (Hold OK) |
Can now leap up with an additional input only on the final hit. |
| Megalomania → ↘ ↓ ↙ ← → + HS |
The timing for throw invincibility now matches the attack startup. |
| Ultimate Fortissimo (Ground) → ↘ ↓ ↙ ← → + S |
The character is in a counter hit state until the end of the recovery. Landing recovery changed from 0F → 9F. Reduced knockback of the projectile. ▼Hitbox adjustment |

We have improved the utility of his normal moves to improve his maneuverability in neutral.
On the other hand, we have toned down his actions utilizing Behemoth Typhoon and the Security Gauge to limit his power once he is on the offensive.
We have extended the active frames of Far S and made it more affected by momentum.
The attack will now reach farther when performed out of a dash.
We have made the same adjustments to Crouching K, giving him access to a low attack after dashing.
We removed the frontal hurtbox of Crouching S, making it a very powerful counter-poke.
We have decreased the startup of Standing HS, and decreased the knockback.
It can now combo off of Far S, increasing its utility.
All versions of Behemoth Typhoon deal less damage, and trigger heavier damage proration.
This makes it harder for him to deal major damage than before.
It also costs 100% of the Security Gauge to cancel into another Behemoth Typhoon after Behemoth Typhoon.
We have also adjusted the blowback for some variations of Behemoth Typhoon, limiting the reward off of mixup.
We have increased the minimum number of projectiles fired by Skyfish.
This addition increases the duration of the move overall as well, making it more risky if the opponent jumps over it.
We have reduced the active frames of Thunderbird when above Level 2.
While it is still a strong strategy to approach with the projectile as a shield, it is now harder to pull off when the opponent has space to back away.
| Adjustment Details | |
|---|---|
| → + P | ▼Hitbox adjustment Changed the timing when the upper hurtbox is smallest from 3F → 4F. |
| Crouching K |
Made it easier to carry momentum. Active frames changed from 3F → 6F. |
| Close Standing S | ▼Hitbox adjustment Changed attack hitboxes above a certain height into follow-up hitboxes. |
| Far Standing S |
Made it easier to carry momentum. Active frames changed from 3F → 5F. ▼Blowback adjustment |
| Crouching S | ▼Hitbox adjustment Removed forward and upward hurtboxes. |
| Standing HS |
Startup changed from 19F → 14F. Recovery changed from 15F → 23F. Reduced knockback. ▼Blowback adjustment |
| Behemoth Typhoon (All Versions) |
Damage changed from 80 → 70. Security Level usage when transitioning into Behemoth Typhoon changed from 50% → 100%. |
| Behemoth Typhoon (Ground) ↑ ↖ ← ↙ ↓ + HS |
▼Blowback adjustment Decreased launch height after ground bounce during the second half of the active frames. |
| Behemoth Typhoon (Ground) ↓ ↙ ← ↖ ↑ + HS |
▼Blowback adjustment Decreased launch height during the first half of the active frames. |
| Thunderbird ↓ ↙ ← + S |
Active frames of the projectile when Security Level is 2 changed from 114F → 74F. When the projectile touches something, it still triggers through to its final hit as before. |
| Skyfish ↓ ↘ → + S (Hold OK) |
The minimum number of projectiles fired when not held changed from 3 → 12. Along with this, the total duration changed from 59F → 86F. |
| Down With The System → ↘ ↓ ↙ ← → + P |
The character is in a counter hit state until the end of the recovery. Can no longer Roman Cancel. |

We have added trajectory options for Throw Servant, to make it possible to send Servants forward in a trajectory that is harder for the opponent to hit.
We have also reassessed the Servant Gauge cost of Countdown, expanding options for her strings and combos.
There are now new uses for →+HS which was very situation-specific before, and it can better extend offense on hit.
On the other hand, her formerly low profile moves Crouching K and Sweep are less potent now, making it harder for her to gain an advantage in neutral when she has no Servants out.
By holding the input for Throw Servant, you can now throw the Servant upwards.
This makes it possible to throw the Servant behind the opponent, allowing you to go on the offensive if the opponent tries to counter your Servant.
Countdown no longer expends the Servant Gauge when the attack activates.
You can set up a new Servant while making the opponent block the explosion, making it more useful in strings and combos.
The second hit of →+HS now triggers a hard knockdown, preventing the opponent from teching.
Using it as the final hit in a combo will make it easier to set up your offense as the opponent wakes up.
However, it creates distance between yourself and the opponent, meaning you need to choose what to use depending on your remaining Servant Gauge and the positioning of any Servants.
Her hurtbox during Crouching K no longer enters a shorter stance due to the universal adjustments.
Sweep is also a low-stance move, and it has received damage proration and combo blowback proration adjustments as a low profile lunging move, which reduces the damage in combos and makes it harder to launch the opponent.
| Adjustment Details | |
|---|---|
| Crouching K | ▼Hitbox adjustment Expanded hurtbox upward. |
| Close Standing S | ▼Hitbox adjustment Changed attack hitboxes above a certain height into follow-up hitboxes. |
| Far Standing S | Reduced knockback on hit. |
| Standing HS | ▼Hitbox adjustment Added a hurtbox to the front of the second hit. |
| → + HS | ▼Blowback adjustment Grounded opponents can no longer tech on landing from the second hit. |
| Pick Up Servant ↓ + P near Servant |
Fixed an issue causing interaction with objects holding collision boxes during the action. |
| Throw Servant (All Versions) → + Attack Button during Pick Up Servant (Air OK) |
Holding the button now changes the trajectory of the Servant. Startup is 4F slower when held compared to the normal version. |
| Countdown (All Versions) ↓ ↙ ← + HS (Air OK) |
The Servant now disappears if Jack-O' enters a hitstun state. No longer consumes the Servant Gauge upon startup. |
| Forever Elysion Driver → ↘ ↓ ↙ ← → + P |
The character is in a counter hit state until the end of the recovery. Can no longer Roman Cancel. Damage changed from 149 → 120. |

Previously, Happy Chaos was able to Fire from his stance instantaneously without any recovery, allowing him to highly benefit from long pokes and fast jabs.
Since he was also able to deal damage and replenish his resources simultaneously, it was easy for him to continue neutral without leaving himself vulnerable.
We determined that it would be challenging to address the fundamental cause of these issues by only adjusting parameters, and have made major changes to his overall mechanics.
We have removed the HS input At the Ready that allowed for Fire without any vulnerability, making it only possible to perform with a hitbox and recovery.
This makes it no longer possible to transition into combos directly after hitting with pokes or jabs when the gun is not readied.
We have changed how the reticle functions, so that it is no longer possible to Fire until after a certain duration has passed since readying the gun.
The stance will also be canceled upon jumping.
It can be just as powerful as before if you use At the Ready in advance and Fire once the reticle is lined up, but his neutral now requires additional steps when the gun is not readied.
Fire can no longer be used after Steady Aim until a certain duration passes, like At the Ready.
However, it becomes possible to Fire sooner than At the Ready, making it still potent as a poke from long range.
It is more challenging to lead into combos afterwards, as it launches the opponent to a lower height on hit.
Instead, by inputting ↑ or ↓ while firing, it is possible to produce projectiles with a delay.
They have different effects on hit, opening up new possibilities in using different options for combos or supporting your neutral game utilizing the delay.
Reload now always loads 6 bullets, with an extended total action time to match.
It now requires taking a corresponding risk to use it to cancel the recovery of a normal move or Fire like before.
Deux Ex Machina no longer reloads bullets, guaranteeing that the player will need to let down their offense at times due to exhausting their resources.
Curse now has an attack hitbox, and functions as a projectile.
However, the hitbox disappears once it hits the ground, giving it limited range.
It can be used as a poke or to cover for the time after entering the stance before it is possible to shoot.
Curse now increases the damage of Fire after touching the opponent.
It no longer decreases the time needed for the reticle to close in as it did before.
When using Scapegoat, the clone now takes an attack instead of Chaos.
However, the hitstop will be shorter when an attack hits the clone, making it challenging to punish the opponent after their attack.
These changes require a strategy based on replenishing resources by using Steady Aim from long range and then approaching with the At the Ready stance active to transition into close range mixup.
This makes careful planning to control the flow of the match even more crucial than before.
| Adjustment Details | |
|---|---|
| Standing K | ▼Blowback adjustment Reduced vertical combo blowback scaling. |
| Crouching K | ▼Hitbox adjustment Expanded hurtbox upward. |
| → + K | ▼Blowback adjustment Now launches the opponent on ground hit. |
| Close Standing S | ▼Hitbox adjustment Changed attack hitboxes above a certain height into follow-up hitboxes. |
| Far Standing S | ▼Blowback adjustment Now launches the opponent on ground hit. |
| Crouching S | Recovery changed from 24F → 18F. Frame advantage on block changed from -13F → -7F. |
| Jumping ↓ + K | Now activated with Jumping HS. Along with this, it can no longer be canceled from Jumping P or Jumping K. |
| Jumping S | Added a Gatling combination into Jumping HS. |
| Jumping HS | Added. Activates the previous Jumping ↓ + K. |
| Ground Throw |
Recovery changed from 39F → 29F. ▼Blowback adjustment |
| Concentration | The gun unequip animation is no longer performed when the Concentration gauge is depleted by Fire. |
| At the Ready HS |
Changed to produce a hitbox similar to the previous ↓ ↘ → + S. Counter hit effect removed. ▼Hitbox adjustment |
| Reticle |
Along with the changes to At the Ready, the properties have been completely revised. Stance is now canceled when jumping while holding the gun. Fire can no longer be used until the reticle is focused. |
| Steady Aim | Fire properties now change by inputting ↑ or ↓. |
| Fire (All Versions) HS during At the Ready or Steady Aim |
The input buffer window has been made 5F earlier. Removed the mechanic where Fire's properties were enhanced by focusing the reticle for a set period. Damage is now increased while the Curse effect is active. |
| Fire HS during At the Ready |
Damage changed from 25 → 35. ▼Blowback adjustment |
| Fire HS during Steady Aim |
Firing 6 times during the action now transitions into the At the Ready state. ▼Blowback adjustment |
| Cancel Aim | The stance can no longer be canceled for a very brief period immediately after Fire. |
| Reload ↓↓ + P |
Can no longer be canceled midway through the action. Along with this, the total duration was changed to 41F. |
| Focus ↓ ↙ ← + P |
Recovery changed from 46F → 41F. |
| Roll ↓ ↙ ← + K |
▼Hitbox adjustment Expanded hurtbox upward. Reduced front and back hurtboxes. |
| Scapegoat ↓ ↘ → + K |
Increased backward movement speed. The clone now erases the opponent's hitbox. Hitstop when the clone withstands an attack changed to 5F. Moved the spawn position of the clone backward. |
| Curse ↓ ↘ → + P |
Along with the changes to At the Ready, the specifications have been completely revised. Added a hitbox to the thrown ball. The projectile now disappears upon touching the ground. Recovery changed from 29F → 42F. Reduced the projectile's upward movement speed. |
| Deus Ex Machina → ↘ ↓ ↙ ← → + S |
Removed the mechanic that restores ammo. Startup changed from 20F → 18F. |

We have expanded her options for grounded neutral by making adjustments to Crouching S, Crouching HS, and the HS version of Kabari, as she tended to rely on Far S before.
We have also adjusted Crouching P so that it serves a different purpose to Standing P.
However, we have adjusted the situation on hit for the follow-up after the HS version of Kabari to reduce the opportunities for okizeme.
We have increased the Attack Level of Crouching S so that it can combo into Crouching HS.
Crouching HS also triggers an untechable hard knockdown like Sweep.
This now makes it possible to land a knockdown after hitting with Crouching S from neutral.
We have also adjusted the blowback of Crouching HS, making it harder to transition into further combos after it.
We have decreased the Attack Level of Crouching P, which decreases the knockback on hit, making it easier to connect into →+K.
It has 1 frame slower startup than Standing P, but can lead into higher reward.
We have sped up the startup of the HS version of Kabari, giving it better utility as a long-range poke.
However, as the follow-up attack causes a soft knockdown now, it is harder to go into okizeme than before.
We have expanded the upper hurtbox of her standing state as it was lower than other characters.
This means that certain moves such as I-No’s Chemical Love will now hit Baiken in her standing state.
| Adjustment Details | |
|---|---|
| Hurtbox |
Expanded hurtbox upward while standing, as it was lower than the standard in this game. Along with this, the hurtboxes of various normals, special moves, and Overdrives were also expanded upward. |
| Standing P | Startup changed from 4F → 5F. |
| Crouching P |
Recovery changed from 9F → 11F. Attack Level changed from 0 → 1. Reduced knockback. |
| → + P | ▼Hitbox adjustment Changed the timing when the upper hurtbox is smallest from 3F → 4F. |
| Crouching S |
Attack Level changed from 2 → 3. Reduced knockback. |
| Crouching HS |
▼Blowback adjustment ▼Hitbox adjustment |
| Kabari (S Version) ← ↙ ↓ ↘ → + S |
Recovery changed from 15F → 14F. ▼Hitbox adjustment |
| Kabari (HS Version) ← ↙ ↓ ↘ → + HS |
Startup changed from 18F → 16F. |
| Kabari Follow-up HS during Kabari (HS Version) |
▼Blowback adjustment The opponent will now tech upon landing. Reduced horizontal blowback. |
| Youzansen ↓ ↘ → + S in mid-air |
▼Hitbox adjustment Reduced downward hurtbox during startup. |
| Hiiragi ↓ ↘ → + P |
Hiiragi can no longer be activated during Deflect Shield. Recovery changed from 26F → 33F. If the animation does not transition into the cinematic after withstanding an attack, the recovery is now reduced by 7F. Damage changed from 100 → 60. ▼Blowback adjustment |
| Tsurane Sanzu-watashi ↓ ↘ → ↓ ↘ → + S |
The character is in a counter hit state until the end of the recovery. Can no longer Roman Cancel. |

We have improved their potential from long range by changing how Unholy Diver and Stain function.
On the other hand, we have limited their power at close range.
We have sped up the startup of Unholy Diver to make it easier to hit the opponent.
However, by increasing the recovery and decreasing the Attack Level, it makes it harder to gain an advantage when it is blocked at close range.
Stain can now be applied up to two times.
Connecting with an attack against the opponent when it has been applied twice causes the explosion to trigger twice, greatly increasing the time to continue into a combo or the advantage upon block.
On the other hand, we have reduced the properties when only one is applied.
It keeps the opponent locked down for less time, making combo timing stricter on hit.
The changes to Unholy Diver make it easier to apply Stain, making it a powerful strategy to focus on long range neutral until Stain is applied twice before launching a close range offensive.
We have increased the recovery of the HS version of Grave Reaper and adjusted the blowback on hit to launch the opponent lower.
It no longer gives Testament an advantage when the input is not held, making it harder to follow up on hit.
This makes it harder to maintain an offensive at close range after approaching when the opponent is not in Stain state.
| Adjustment Details | |
|---|---|
| Crouching K | ▼Hitbox adjustment Expanded hurtbox upward. |
| Close Standing S | ▼Hitbox adjustment Changed attack hitboxes above a certain height into follow-up hitboxes. |
| Jumping K | Active frames changed from 3F → 6F. |
| Stain |
When applying Stain to an opponent already in the Stain state, up to 2 Stains can now be applied. The animation no longer stops during superflash up to a certain point in the animation. Hitstop changed from 14F → 7F. ▼Blowback adjustment |
| Grave Reaper (Ground HS Version) ↓ ↘ → + HS |
Recovery changed from 37F → 41F. ▼Blowback adjustment |
| Grave Reaper (Ground HS Version - Max Hold) ↓ ↘ → + HS (Max Hold) |
▼Blowback adjustment Reduced the projectile's horizontal blowback. |
| Unholy Diver ↓ ↙ ← + P (Hold OK) |
Startup changed from 21F → 16F. Attack Level changed from 2 → 0. Recovery changed from 39F → 42F. ▼Blowback adjustment |
| Nostrovia ↓ ↘ → ↓ ↘ → + P |
Increased the projectile's movement speed. ▼Blowback adjustment |
| Calamity One ↓ ↘ → ↓ ↘ → + K |
The character is in a counter hit state until the end of the recovery. Can no longer Roman Cancel. |

We have added a new mechanic to Rolling Movement, allowing for better developments before placing the yo-yo.
In exchange, the grounded S version of Stop and Dash (↓↘→+S) and Kick Start My Heart are now weaker, making it harder to create situations where her offense can be greatly extended.
She can now perform Rolling Movement even when the yo-yo is not set up.
This makes it possible to rise slightly in the same position and perform an aerial action, functioning similarly to a jump cancel.
This version of Rolling Movement has no attack hitbox, and can only be used while on the ground.
Command Normal 4 (follow-up attack after Close S or Crouching S) no longer sends the opponent flying back far on hit.
Kick Start My Heart and the HS version of Stop and Dash (↓↘→+HS) hit as a combo off of it now, making it easier to maintain offense after Command Normal 5 (follow-up attack after Standing HS or Crouching HS).
We have increased the recovery of the grounded S version of Stop and Dash (↓↘→+S).
This makes it impossible to create an advantageous situation when the opponent blocks it at mid-range, meaning it is more challenging to maintain offense in the corner.
This requires her to vary her neutral with different yo-yo set-up options using Rolling Movement.
We have also increased the recovery for Kick Start My Heart.
This adjustment makes it so that Bridget will not have an advantage even when the opponent blocks the active frames.
| Adjustment Details | |
|---|---|
| Crouching P | Reduced knockback. |
| → + K |
Increased knockback. Increased forward movement speed. |
| Close Standing S | ▼Hitbox adjustment Changed attack hitboxes above a certain height into follow-up hitboxes. |
| Command Normal 4 S after Far Standing S or Crouching S |
▼Blowback adjustment |
| Stop and Dash (Ground S Version) ↓ ↘ → + S |
Recovery changed from 38F → 46F. Frame advantage on block at point-blank range changed from -4F → -12F. |
| Rolling Movement (Ground) ↓ ↙ ← + K (Hold OK) |
Can now be activated on the ground even when the yo-yo is not deployed. Performs a small leap when doing so. |
| Starship → ↓ ↘ + P |
Counter hit effect removed. Landing recovery changed from 14F → 26F. ▼Blowback adjustment |
| Kick Start My Heart ↓ ↘ → + K |
Recovery changed from 9F → 16F. Frame advantage on block changed from -20F → -27F. |

We have reassessed the properties of Still Growing to make it possible to play aggressively using Stamina often.
In exchange, we have reduced the strength of actions that cost Stamina to prevent his combos from dealing excessive damage.
Still Growing no longer provides random power-ups, instead increasing the Stamina gain rate for a duration.
It also reduces the cooldown time before you can gain more Stamina that occurs after using Stamina.
By using it in lulls during neutral or after scoring a knockdown, you can increase your opportunities to perform powerful actions using Stamina afterwards.
While he can gain more Stamina now, each action that costs Stamina is less powerful.
We have adjusted the blowback for the follow-up after Beak Driver, meaning you can no longer land additional attacks after Gazelle Step.
The follow-up after Hoof Stomp no longer triggers wall bounce, making it no longer possible to land additional attacks without using Tension gauge.
Elk Hunt and the follow-up attack have received the damage and combo blowback proration applied to low profile lunging moves, reducing damage in combos and the height of its launch.
It was possible to trigger Wall Break with R.T.L by changing directions even when it was activated while Sin was in the corner.
As this meant the reward was exceptionally great for an invincible reversal, we have removed the invincibility with these adjustments.
| Adjustment Details | |
|---|---|
| Close Standing S | ▼Hitbox adjustment Changed attack hitboxes above a certain height into follow-up hitboxes. |
| Standing HS | Recovery changed from 18F → 17F. Frame advantage on block changed from -2F → -1F. |
| → + HS |
Increased forward movement speed. ▼Blowback adjustment |
| Beak Driver ↓ ↘ → + HS |
Added stagger effect on counter hit. |
| Beak Driver Follow-up HS during Beak Driver |
▼Blowback adjustment Increased horizontal blowback. Reduced tumble duration. |
| Hawk Baker → ↓ ↘ + S |
Can no longer be canceled into follow-up actions when used as a combo starter. Counter hit effect removed. Recovery changed from 36F → 46F. Fixed an issue causing the opponent to be launched as if hit during a combo when hitting an opponent in Guard Crush. ▼Blowback adjustment ▼Hitbox adjustment |
| Hawk Baker Follow-up S during Hawk Baker |
Reduced knockback on hit. Increased forward movement speed. ▼Blowback adjustment |
| Hoof Stomp Follow-up S during Hoof Stomp |
▼Blowback adjustment Removed wall bounce effect. |
| Elk Hunt Follow-up K during Elk Hunt |
Fixed an issue causing the opponent to be launched as if hit during a combo when hitting an opponent in Guard Crush. |
| Still Growing → ↘ ↓ ↙ ← + P |
Removed the mechanic where a stat was randomly increased. Added an effect that accelerates Stamina recovery for a set period. Recovery changed from 49F → 40F. |
| R・T・L (All Versions) → ↘ ↓ ↙ ← → + HS (Air OK) |
Removed strike invincibility and throw invincibility. Tension Gauge is now spent on the first frame of startup. Can no longer be canceled into follow-up actions on block. |
| Tyrant Barrel ↓ ↘ → ↓ ↘ → + P |
Now nullifies knockback applied to himself. |

We have expanded its options for neutral and strings making use of error 6E by making adjustments to the rarely used call 0x$1.00 and call 4B3 which was rarely used outside of combos.
On the other hand, we have toned down Jumping S which was highly potent in neutral and Jumping D which was challenging to counter while offering high reward, limiting its ability to approach the opponent without error 6E active.
call 0x$1.00 now powers up the currently active error 6E effect.
The follow-up attack triggered is more powerful than the standard version, while not as potent as call 13C.
By using it during lulls in neutral or after scoring a knockdown with →+HS, you can apply formidable pressure.
call 4B3 can now be held to halt the action midway through.
This makes it possible to activate error 6E with only a short action, allowing you to maintain error 6E outside of combo situations.
We have reduced the horizontal hitbox of Jumping S, reducing its ability to draw the opponent in.
This makes it harder to enter Close S range after it is blocked, reducing its ability to maintain offense.
Jumping D can no longer be canceled with a jump or command movement.
This means that you will lose your turn on the offensive if it is blocked without error 6E active, making it more challenging to extend pressure while performing mixup.
We have also adjusted the launch on hit, making it possible to connect into Crouching P then call 4B3 on hit.
| Adjustment Details | |
|---|---|
| → + P | ▼Hitbox adjustment Changed the timing when the upper hurtbox is smallest from 3F → 4F. |
| Close Standing S | ▼Hitbox adjustment Changed attack hitboxes above a certain height into follow-up hitboxes. |
| Standing HS | ▼Blowback adjustment Reduced horizontal blowback after ground bounce. Increased launch height after ground bounce. |
| Jumping S |
Reduced vacuum effect. ▼Hitbox adjustment |
| Jumping D |
Removed the ability to jump cancel. Landing recovery changed from 21F → 16F. ▼Blowback adjustment |
| call 4BA (All Versions) ↓ ↘ → + P (Air OK) |
The error 6E projectile enhanced by call 13C now disappears if Bedman? enters a hitstun state. |
| call 4B3 (All Versions) ↓ ↘ → + S (Air OK) |
The animation can now be interrupted with S after startup. The error 6E projectile enhanced by call 13C now disappears if Bedman? enters a hitstun state. |
| call 4B9 (Follow-up) ↓ ↘ → + HS (Hold OK) |
The error 6E projectile enhanced by call 13C now disappears if Bedman? enters a hitstun state. |
| call 0x$0.20 (Mid-air) ↓ ↙ ← + P in Mid-air |
Delayed the timing when it starts falling. Recovery changed from 30F → 40F. |
| call 0x$1.00 (All Versions) ↓ ↙ ← + K (Air OK) |
The retained error 6E is now enhanced. Recovery changed from 24F → 35F. |
| call 4CC → ↘ ↓ ↙ ← → + HS |
The character is in a counter hit state until the end of the recovery. Can no longer Roman Cancel. |

Asuka excels in explosive attack power once he sets up his offense, however he was able to force the opponent to block for an extended time and it was very challenging for the opponent to take their turn back if Asuka managed his resources effectively.
While we are aware of how highly challenging it is to manage his resources, it became more common to see these situations in high level matches as players became increasingly advanced.
We have reduced his abilities to replenish Mana, making it harder to continue a one-sided offense.
In exchange, we have made him easier to play by making some Spells available at will with command inputs.
We have removed the versions of Recover Mana that cost Tension gauge and health, keeping only the version that restored the smallest amount of Mana.
We have also toned down the effects of Spells that reduced Mana cost or recovered Mana directly, while decreasing the amount of these Spells in each Test Case.
We have also increased the Mana cost of Spells with attack hitboxes.
These changes make it more likely to exhaust all of your Mana in matches, thus losing your turn on the offense.
It is also now possible to cast Spells that cost more than your remaining Mana, thus willingly entering the exhausted Mana state.
Bookmark now simultaneously discards and obtains Spells.
It previously required two inputs to manage your Spells at hand, but it can now be performed with one input, greatly reducing the time required to manage Spells.
↓↓+P or ↓↓+K performs his new special move, Chant (Synthesize).
This special move is a Spell that will set up a scepter corresponding to the currently selected Test Case.
For example with Test Case 1 selected, ↓↓+P sets up Shooting Time Stretch (Accelerate) and ↓↓+K sets up Shooting Time Stretch (Decelerate).
This makes it possible to place a scepter at will that will work in synergy with your current Spells and Mana available.
Performing Chant with all Spell slots empty now activates a short-range projectile.
This Spell cannot be canceled into other actions and causes little blowback on hit, making it challenging to combo with.
However it does not cost any Mana and can be used when Mana is fully expended, meaning it can be used to cancel moves with extended recovery such as Standing HS or Sweep to cover for vulnerability regardless of your current Mana.
→+HS was easy to hit while confirming Asuka’s Spells on hand, and challenging for the opponent to see coming.
We have changed it to a mid attack, but sped up the startup to give it better utility despite losing its mixup potential.
It is easier now to hit as a finisher in combos and triggers a hard knockdown, providing time to set up an advantageous situation with Recover Mana or Bookmark.
| Adjustment Details | |
|---|---|
| Close Standing S | ▼Hitbox adjustment Changed attack hitboxes above a certain height into follow-up hitboxes. |
| → + HS |
Changed to a mid attack. Startup changed from 25F → 21F. Base damage scaling changed from 80% → 90%. |
| Test Case 1 |
Removed Shooting Time Stretch (Acceleration). Quantity of Howling Metron changed from 6 → 7. |
| Test Case 2 |
Removed High-Pass Filter Gravity. Quantity of Metron Screamer 808 changed from 3 → 4. |
| Test Case 3 |
Removed Gravity Rod (Shooting). Quantity of Howling Metron MS Processing changed from 2 → 3. |
| Chant (All Versions) ↓ ↘ → + P or K or S or HS (Air OK) |
Spells can now be cast even when the Mana cost is higher than the remaining amount. A unique spell is now activated when the slot is empty. |
| Chant (Synthesize) ↓↓ + P or K |
Added. Duration of all staves changed from 600F → 300F. |
| Bookmark (All Versions) ↓ ↙ ← + P or K or S or HS (Air OK) |
Discarding and acquiring spells is now done in a single motion. The recovery time has been unified to match the original spell acquisition recovery. |
| Recover Mana ↓↓ + S (Hold OK) |
Removed the old K version (consumes Tension Gauge) and S version (consumes Health). The old P version is now activated with ↓ ↓ + S. |
| Reduce Mana Cost | Duration changed from 600F → 300F. |
| Shooting Time Stretch (Accelerate) | Removed Guard Crush effect from affected spells. |
| Shooting Time Stretch (Decelerate) |
Added Guard Crush effect to affected spells. Increased movement speed of affected spells. |
| Howling Metron |
Increased Mana cost. ▼Hitbox adjustment |
| Delayed Howling Metron |
Increased Mana cost. ▼Hitbox adjustment |
| Howling Metron MS Processing | Increased Mana cost. |
| Metron Screamer 808 | Increased Mana cost. |
| Metron Arpeggio | Increased Mana cost. |
| Delayed Tardus Metron |
Increased Mana cost. ▼Hitbox adjustment |
| Terra Metron | Increased Mana cost. |
| Accipiter Metron | Increased Mana cost. |
| Aquila Metron | Increased Mana cost. |
| Bit Shift Metron | Increased Mana cost. |
| RMS Boost Metron |
Increased Mana cost. Reduced the number of spell casts required for enhancement. |

We reassessed the properties of the S version of Deal which was rarely used, improving its ability to apply pressure from neutral.
We have also improved the properties of his →+HS and Crouching S to make it easier to connect with attacks.
We have improved controls for him by reducing the difficulty of certain techniques using dash.
In exchange, we have adjusted Mist Finer to reduce the benefit on counter hit.
We have changed the trajectory of the card from the S version of Deal, now tossing it to a farther position than the K version.
As it places the card behind the opponent, it creates situations where the opponent struggles to move away.
We have extended the range of →+HS, and it now launches the opponent on grounded hit.
On hit, you can approach with Vault or combo into Joker Trick, opening up greater potential reward than Mist Finer on hit.
Crouching S also has additional range, making it easier to hit the opponent as they attempt to approach while adjusting your spacing.
His dash was previously possible to cancel with a jump during startup, and it can now be canceled into special moves.
Previously this was a technique to cancel the startup of the jump mid-dash into a special move to perform it with added momentum, but this change makes it easier to perform.
Mist Finer no longer triggers the slowdown effect on counter hit, reducing the benefit possible on hit.
This addresses how powerful it was against opponents with projectiles in particular.
| Adjustment Details | |
|---|---|
| Dash | Can now be canceled into special moves while it can be jump canceled. When doing so, the special move will carry momentum. |
| Close Standing S | ▼Hitbox adjustment Changed attack hitboxes above a certain height into follow-up hitboxes. |
| Crouching S | ▼Hitbox adjustment Expanded hitbox forward. |
| Standing HS | Reduced knockback. |
| → + HS |
▼Blowback adjustment ▼Hitbox adjustment |
| Mist Finer (Ground) ↓ ↙ ← + P or K or S |
Counter hit effect removed. |
| Mist Finer (Ground K Version) ↓ ↙ ← + K |
▼Hitbox adjustment Added a follow-up hitbox to the lower part of the hitbox. |
| Turn Up | Fixed an issue where the hitbox sometimes did not disappear even if Johnny entered a hitstun state. |
| Deal (S Version) ↓ ↘ → + S |
Changed the trajectory of the card. It now throws the card further than the K version. |
| Ensenga ↓ ↙ ← + HS |
Made it easier to carry momentum. Active frames changed from 3F → 6F. ▼Blowback adjustment ▼Hitbox adjustment |
| That's My Name → ↘ ↓ ↙ ← → + HS |
The character is in a counter hit state until the end of the recovery. Can no longer Roman Cancel. |
| Joker Trick ↓ ↘ → ↓ ↘ → + S |
▼Hitbox adjustment Added a follow-up hitbox to the lower part of the hitbox. |

We have added a new mechanic to Miss Charlotte to expand its utility in neutral and strings.
It is also easier to use Up High! as mixup against opponents who have invincible moves.
On the other hand, we have revised the composition of her combos and strings to make it harder to loop her mixup.
We have also toned down her moves that offered high reward with little risk.
Miss Charlotte can be held to trigger a second attack hitbox.
It performs one hit before the bullet trajectory changes, and one hit afterwards.
This gives Elphelt a significant advantage if the opponent blocks it at close range, making it great for extending her offense.
We have expanded the upper hitbox of the first hit of Up High! so that it will now form a gapless blockstring against all characters when making them block Up High! after Here I Go!
This increases her offensive pressure as she does not need to account for the opponent using an invincible move or backdash to get out.
The opponent will now tech after they are hit by Nailed It!
This makes it challenging to recreate the same situation from an overhead/low mixup.
Miss Charlotte (Out of Repair) ends directly after hitting, meaning the advantage remains the same regardless of the position it hits.
This makes it harder to punish on block from any distance, meaning it works better as a lunging move. However, it creates more distance on hit, making it harder to maintain offense afterwards.
We have decreased the movement speed of Bomb-Bomb Chocolat, decreasing the forward distance covered.
This tones it down, as it was a powerful option in mixup and to beat out the opponent’s pokes, while providing high reward on hit.
It no longer works as a cross-up unless used at a closer distance.
| Adjustment Details | |
|---|---|
| Crouching P | Startup changed from 4F → 5F. |
| → + P |
▼Blowback adjustment ▼Hitbox adjustment |
| Close Standing S | ▼Hitbox adjustment Changed attack hitboxes above a certain height into follow-up hitboxes. |
| → + HS | ▼Hitbox adjustment Expanded hurtbox backward during startup. |
| Miss Charlotte (All Versions) ↓ ↘ → + S or HS (Air OK) |
A projectile with different properties now fires when holding the button. |
| Miss Charlotte (Out of Repair) ↓ ↙ ← + K |
Recovery changed from 10F → 17F. Reduced knockback. Reduced horizontal movement speed when the active frames end. |
| Bomb-Bomb Chocolat ↓ ↙ ← + HS |
Made it harder to carry momentum. |
| Here I Go! ↓ ↙ ← + S or S during Chain Lollipop |
Added stagger effect on hit for Here I Go! when following up Here I Go! Startup of Here I Go! after Here I Go! changed from 20F → 17F. |
| Up High! P during Chain Lollipop |
▼Hitbox adjustment Expanded hitbox and hurtbox downward for the initial hit. |
| Nailed It! HS during Chain Lollipop |
▼Blowback adjustment The opponent will now tech upon landing. |
| Juganto da Parfeo → ↘ ↓ ↙ ← → + HS |
The character is in a counter hit state until the end of the recovery. Can no longer Roman Cancel. |

It was easy to gain Jealousy gauge as a result of some moves in her standard state being powerful and leading to high benefit.
We have revised the initial Jealousy gauge value and structure of her combos to highlight her frailty in the standard state.
We have also increased the risk upon exiting Jealous Rage, making it more crucial to manage the Jealousy gauge.
・Standard state
We have reduced the initial value of the Jealousy gauge at round start from 50% to 25%.
This makes it necessary to gain Jealousy gauge from neutral in the standard state before you can achieve the powerful Jealous Rage state.
We have also revised the properties of Standing HS, Intertwine and Tilt, and Menace and Groan to make it harder to transition into highly damaging combos after a Standing HS counter hit.
We have changed Bonding and Dissolving to be minus on block, and increased the knockback so that it returns the situation to neutral.
This means she needs to use riskier moves such as Haul and Heed in order to maintain offense while in the standard state.
・Jealous Rage
It is impossible to block during the ending animation when the Jealousy gauge is exhausted.
This makes it necessary to strategically use a move with extended blockstun if you are unable to safely exit the mode with Bonding and Dissolving or Changing and Swaying.
When returning to the standard state with Changing and Swaying, some of the Jealousy gauge spent is returned. We have decreased the amount of gauge that returns.
Previously, it restored 50% of the expended Jealousy gauge, but this has been decreased to 25%.
This restricts the potency of exiting Jealous Rage with Changing and Swaying and then transitioning back into Jealous Rage by using Changing and Swaying again.
We have decreased the advantage for A.B.A when “The Law is Key, Key is King.” is blocked.
It still leaves her at an advantage when blocked, but it is harder to go on the offensive when it is blocked at long range.
These changes decrease the opportunities to enter Jealous Rage, so we have improved the utility of some moves in the standard state.
She now struggles to finish a match in one fell swoop, requiring a careful strategic approach to switch between modes.
We have expanded the upper hurtbox of her standing state as it was lower than other characters.
This means that certain moves such as I-No’s Chemical Love will now hit A.B.A in her standing state.
| Adjustment Details | |
|---|---|
| Hurtbox |
Expanded hurtbox upward while standing, as it was lower than the standard for characters in this game. Along with this, the hurtboxes of various normal attacks, special moves, and Overdrive attacks were also expanded upward. |
| → + P (Standard State/Jealous Rage) |
▼Hitbox adjustment Changed the timing when the upper hurtbox is smallest from 3F → 4F. |
| Crouching P (Standard State/Jealous Rage) |
Startup changed from 4F → 5F. Recovery changed from 10F → 9F. |
| Close Standing S (Standard State/Jealous Rage) |
▼Hitbox adjustment Changed attack hitboxes above a certain height into follow-up hitboxes. |
| Far Standing S (Standard State) |
Recovery changed from 14F → 22F. Increased forward movement speed. |
| Crouching S (Standard State) |
▼Hitbox adjustment Added a follow-up hitbox to the lower part of the hitbox. |
| Standing HS (Standard State) |
▼Blowback adjustment Now launches the opponent on ground hit. Reduced horizontal blowback after ground bounce. Decreased launch height after ground bounce on counter hit. |
| Jumping HS (Standard State) |
Startup changed from 16F → 24F. Active frames changed from 4F → 7F. ▼Hitbox adjustment |
| Jumping HS (Jealous Rage) |
▼Blowback adjustment Reduced horizontal blowback after ground bounce. |
| Jealousy Gauge | Initial value changed from 50% → 25%. |
| Jealous Rage End when Jealousy Gauge is depleted |
A 10F recovery period now occurs after the superflash ends. Activation can no longer be delayed by using Faultless Defense. Added a "PUNISH" text when taking damage during the action. |
| Bonding and Dissolving (Ground) (Standard State/Jealous Rage) ↓ ↙ ← + HS |
Startup changed from 12F → 14F. Reduced Guard Crush duration. Increased knockback on block. |
| Bonding and Dissolving (Mid-air) (Standard State/Jealous Rage) ↓ ↙ ← + HS in mid-air |
▼Blowback adjustment Grounded opponents can no longer tech on landing. |
| Change and Swaying (Jealous Rage) → ↘ ↓ ↙ ← + P |
Recovery amount of the Jealousy Gauge changed from 50% → 25% of what was consumed. |
| Intertwine and Tilt (Standard State) ↓ ↘ → + K |
Recovery changed from 13F → 15F. ▼Blowback adjustment |
| Intertwine and Tilt (Jealous Rage) ↓ ↘ → + K |
Recovery changed from 15F → 17F. ▼Blowback adjustment |
| Menace and Groan (Standard State) ↓ ↘ → + S |
▼Blowback adjustment Decreased launch height on air hit. |
| Restriction and Constraint (Standard State) → + S during Menace and Groan |
Reduced Jealousy Gauge recovery amount. Recovery changed from 31F → 43F. |
| Restriction and Constraint (Jealous Rage) → + S during Menace and Groan |
Recovery changed from 31F → 43F. Frame advantage on hit changed from +60F → +48F, and frame advantage on block changed from -15F → -27F. |
| Frenzy and Astonishment ↓ ↙ ← + S |
Added a recovery period where only blocking is possible after withstanding an opponent's attack. Startup time required to withstand an opponent's attack changed from 7F → 5F. Recovery changed from 37F → 53F. |
| The Law is Key, Key is King. (Standard State/Jealous Rage) → ↘ ↓ ↙ ← → + HS |
The character is in a counter hit state until the end of the recovery. Can no longer Roman Cancel. |
| Keeper of the Key (Jealous Rage) → ↘ ↓ ↙ ← → + K |
Reduced Guard Crush duration. |

We have improved the feel of his controls by making certain techniques using dash easier.
We have changed →+HS to unique properties that make it viable as a new option in offense.
We have increased the benefit from Bump Ahead on hit, while reducing the mixup capabilities of It’s Late.
We have adjusted the K version of Mappa Hunch so that it is more likely Slayer loses his turn on block.
We have also revised the properties of Crouching HS to make it less likely to beat out pokes or attempts at intercepting.
His dash was previously possible to cancel with a jump during startup, and it can now be canceled into special moves.
Previously this was a technique to cancel the startup of the jump mid-dash into a special move to perform it with added momentum, but this change makes it easier to perform.
We have made major revisions to the properties of →+HS to give Slayer an advantage when the active frames are blocked.
This gives Slayer an advantage when the opponent blocks it crouching as the active frames are likely to connect, while leaving him at a disadvantage when the opponent blocks it standing.
This is very powerful when used in situations where low attack options are available, such as after Standing K or Close S.
We have adjusted Bump Ahead to launch higher on hit, making it possible to combo into Crouching K.
On the other hand, we have slowed down the startup of It’s Late, making it more likely to be blocked.
This makes it more challenging to use mixup after Dandy Step, but offers better reward when it succeeds.
We have increased the recovery of the K version of Mappa Hunch, so it now leaves Slayer at a disadvantage even when the active frames are blocked.
It also now triggers additional knockback instead, so that it is harder to punish when outside of point blank range.
We have removed the foot property invincibility from Crouching HS.
This tones down the attack as it worked very well against low-hitting attacks or attempts at intercepting strings while being highly rewarding.
It maintains the same long range, meaning it is still powerful when hitting at maximum range.
| Adjustment Details | |
|---|---|
| Dash | Can now be canceled into special moves while it can be jump canceled. When doing so, the special move will carry momentum. |
| Close Standing S | ▼Hitbox adjustment Changed attack hitboxes above a certain height into follow-up hitboxes. |
| → + K | ▼Hitbox adjustment Fixed an issue where there was no hurtbox at his feet upon landing with the charged version. |
| Crouching HS | ▼Hitbox adjustment Added a hurtbox at his feet during startup. |
| → + HS |
Recovery changed from 16F → 13F. Attack Level of the first half of the active frames changed from 4 → 1. Increased knockback on hit for the second half of the active frames. |
| Sweep | ▼Hitbox adjustment Added a horizontal proximity requirement. |
| Mappa Hunch (P Version) ↓ ↘ → + P |
Hitstop on hit changed from 14F → 15F. |
| Mappa Hunch (K Version) ↓ ↘ → + K |
Recovery changed from 15F → 19F. Increased knockback. ▼Blowback adjustment |
| Dandy Step (P Version) ↓ ↙ ← + P |
Reduced the damage of the follow-up Pilebunker |
| Pilebunker P during Dandy Step |
▼Hitbox adjustment Added a follow-up hitbox behind the hitbox. |
| Bump Ahead K during Dandy Step |
▼Blowback adjustment ▼Hitbox adjustment |
| It's Late S during Dandy Step |
Startup changed from 13F → 21F. |
| Bloodsucking Universe → ↘ ↓ ↙ ← + HS |
Removed throw invincibility. |
| Hand of Doom → + S while backdash |
As this is a follow-up move performed from an invincible backdash, adjustments identical to invincible moves have been applied. Counter hit effect removed. Added stagger effect on ground hit. Base damage scaling changed from 80% → 60%. ▼Blowback adjustment |
| Super Mappa Hunch → ↘ ↓ ↙ ← → + S |
Removed the mechanic that caused it to hit twice at certain distances. |

We have added a new mechanic to “We talked a lot together” to expand its utility at neutral and in strings.
We have also made Jumping HS more viable and easier to connect with the opponent.
We have her Sweep riskier to whiff.
We have changed the situation after the S version of Michael Sword hits, adjusting it so that Dizzy struggles to maintain a one-sided advantage.
We have also reduced the benefit of the HS version of Michael Sword mid-combo, reducing excessive combo damage.
There is now an additional input available after “We talked a lot together,” which can change the spawn position of the projectile.
The S input spawns the projectile behind Dizzy.
By placing Dizzy to the front of the projectile, it makes it possible to cover for her vulnerability after an attack with the projectile.
The HS input spawns the projectile far to the front.
It reaches the opponent right away, requiring them to take an action to deal with it.
We have added a hitbox to the base part of Jumping HS, making it easier to hit opponents below.
It can now hit a crouching opponent when performed after an aerial dash, making it viable in certain mixup strings.
We have increased the recovery of Sweep.
This provides more of an opportunity for the opponent to counter or approach when it whiffs, as it has very long range and is highly rewarding on counter hit.
The opponent will now tech after they are hit by the S version of Michael Sword.
You will still have time to set up projectiles such as “We talked a lot together” or “For roasting chestnuts,” but it is more challenging to set up Ice Field to launch a powerful neutral offensive.
We have slowed down the startup of the HS version of Michael Sword, adjusting the advantage on block.
This makes it harder to extend combos after Crouching S or Sweep on counter hit.
On the other hand, it leaves her and the opponent even on block at a distance, giving Dizzy the opportunity to use her long range to start again.
Dizzy highly benefits from the universal adjustments to the Tension and Burst gauges.
Previously, “I used this to catch fish” and Ice Field’s heavy combo blowback proration suffered from allowing the opponent to charge up their gauges. These adjustments now reduce the amount of gauge the opponent will gain.
| Adjustment Details | |
|---|---|
| Crouching P | Reduced knockback. |
| → + P | ▼Hitbox adjustment Changed the timing when the upper hurtbox is smallest from 3F → 4F. |
| Close Standing S | ▼Hitbox adjustment Changed attack hitboxes above a certain height into follow-up hitboxes. |
| Far Standing S |
Made it easier to carry momentum. Reduced knockback for all but the final hit. |
| Sweep | Recovery changed from 21F → 27F. Frame advantage on block changed from -10F → -16F. |
| Jumping HS |
Reduced knockback. ▼Hitbox adjustment |
| I used this to catch fish (All Versions) ↓ ↙ ← + P or K |
The projectile can now be spawned behind by inputting S during the action. The projectile can now be spawned to the front by inputting HS during the action. |
| Michael Sword (S Version) ↓ ↙ ← + S |
▼Blowback adjustment |
| Michael Sword (HS Version) ↓ ↙ ← + HS |
Startup changed from 26F → 29F. Increased Guard Crush duration. |
| Imperial Ray → ↘ ↓ ↙ ← → + S |
The character is in a counter hit state until the end of the recovery. Can no longer Roman Cancel. |
| Gamma Ray → ↘ ↓ ↙ ← → + HS |
Fixed an issue preventing the move from transitioning to the cinematic when hitting under certain conditions. |

We have improved the properties of QV to improve his options after the opponent blocks a poke.
We have also revised the angle and strength of the ball rebound after Crouching HS and Sweep, improving utility during neutral.
We have adjusted Jumping D so that it is easy to confirm the situation after it, as the situation varies greatly if the opponent uses Faultless Defense.
On the other hand, we have increased the recovery of all versions of Stinger Aim, making it easier for the opponent to act when it is blocked.
We have adjusted the Attack Level and hitstop of QV when it is held.
When fully charged, it leaves Venom at an advantage on block, making it highly effective against opponents who are focused on blocking.
This also adds additional time for your next attack, increasing the reward when used in combos.
We have adjusted the angle and strength of the ball rebound after Crouching HS and Sweep.
Sweep now rebounds the ball upward, allowing it to prevent the opponent from approaching with an aerial dash.
The angle of the ball rebound after Crouching HS remains similar to before, but it now moves with more force, making it effective as a poke against opponents in the air at long range.
It was previously uncertain whether Jumping D would form a gapless blockstring with the HS version of Carcass Raid depending on how the opponent blocked.
With these adjustments, we have changed the hit effect of the final hit to make it possible to continue the combo into Crouching K or other moves even without canceling into the HS version of Carcass Raid.
In exchange, we have increased the knockback so that it can no longer form a gapless blockstring with the HS version of Carcass Raid.
This makes it easier to lose his turn when it is blocked.
Stinger Aim was extremely powerful when fired repeatedly as the projectile moves fast and recovers quickly.
We have extended the recovery to make it harder to fire repeatedly, and decreased the advantage on hit.
| Adjustment Details | |
|---|---|
| → + P | ▼Hitbox adjustment Changed the timing when the upper hurtbox is smallest from 3F → 4F. |
| Close Standing S | ▼Hitbox adjustment Changed attack hitboxes above a certain height into follow-up hitboxes. |
| Crouching HS |
Angle the ball is deflected changed from -59 degrees → -50 degrees. Startup changed from 17F → 15F. |
| → + HS | Startup changed from 21F → 18F. |
| Sweep |
Angle the ball is deflected changed from -20 degrees → 75 degrees. |
| Jumping D |
Fixed an issue preventing the attack from occurring after landing if he landed exactly at the time of startup. Increased knockback of the final hit. ▼Blowback adjustment ▼Hitbox adjustment |
| Ball | Fixed an issue preventing the Ball from disappearing when its duration ended after being deflected. |
| QV (Lightly Hold Versions) → ↓ ↘ + P or K or S or HS (Lightly Hold) |
Attack Level changed from 2 → 3. Hitstop changed from 6F → 10F. |
| QV (Max Hold Versions) → ↓ ↘ + P or K or S or HS (Fully Hold) |
Attack Level changed from 2 → 4. Hitstop changed from 6F → 11F. |
| Stinger Aim (All Versions) ← (Hold) → + S or HS |
Charge time changed from 30F → 25F. |
| Stinger Aim (S Version) ← (Hold) → + S |
Recovery changed from 39F → 47F. Frame advantage on block from round start position changed from -2F → -10F. |
| Stinger Aim (HS Version) ← (Hold) → + HS |
Recovery changed from 47F → 55F. Frame advantage on block from round start position changed from -13F → -21F. |
| Carcass Raid (All Versions) ↓ (Hold) ↑ + S or HS |
Charge time changed from 30F → 25F. |
| Carcass Raid (Ground) ↓ (Hold) ↑ + S or HS |
▼Hitbox adjustment Reduced upward hitbox and hurtbox. |
| Carcass Raid (Mid-air) ↓ (Hold) ↑ + S or HS in mid-air |
▼Hitbox adjustment Reduced forward and downward hurtboxes. |
| Tryambaka → ↘ ↓ ↙ ← → + K |
Removed throw invincibility. |

We have changed the mechanics of →+HS which was rarely used, expanding her options for combos and strings.
We have adjusted Weapons Free to create more opportunities to use it.
On the other hand, we have lessened the potency of A.T.T.G. Top-Attack mid-combo to prevent excessive combo damage.
→+HS now produces a short-range projectile hitbox.
This makes it possible to perform an attack while entering Mode: Arbalest, creating more powerful offensive options after Standing K or Close S.
We have sped up the startup of Weapons Free, extending the forward travel distance.
It can now combo from →+P or Far S, creating many more opportunities to hit with it.
We have adjusted the launch on aerial hit of the Mode: Arbalest version of A.T.T.G. Top-Attack, making it harder to use mid-combo.
However, it now causes a hard knockdown that cannot be teched on hit, giving it more utility as the finisher in a combo.
As A.C.T.G. Blast-Off has two hits, it could be challenging for the opponent to punish on block at long range.
We have changed it so that the second hit will not connect with a grounded opponent, making it easier for the opponent to punish on block.
We have made the same adjustment to Megadeath Buster.
| Adjustment Details | |
|---|---|
| Close Standing S | ▼Hitbox adjustment Changed attack hitboxes above a certain height into follow-up hitboxes. |
| → + HS |
A projectile now fires. The character is in a counter hit state until the end of the recovery. |
| Sweep | Increased knockback. |
| Command Normal 4 ↓ + S after Far Standing S or Crouching S |
Increased knockback. ▼Blowback adjustment |
| A.M.T.G. Streak (Standard Mode/Mode: Arbalest) ↓ ↘ → + HS |
▼Hitbox adjustment Added a proximity requirement preventing it from hitting an opponent located behind the character's own pushbox. |
| A.T.T.G. Top-Attack (Mode: Arbalest) ↓ ↙ ← + K |
▼Blowback adjustment Grounded opponents can no longer tech on landing. Decreased launch height after ground bounce. |
| A.C.T.G. Blast-Off (Standard Mode/Mode: Arbalest) → ↓ ↘ + S |
Counter hit effect removed. The second hit now only connects against airborne opponents. |
| A.C.T.G. Blast-Off (Standard Mode) → ↓ ↘ + S |
Recovery changed from 40F → 56F. ▼Blowback adjustment |
| Blaze a Trail ↓ ↙ ← + S |
Fixed an issue where Arbalest Mode did not persist when activating Blaze a Trail during Arbalest Mode and canceling its startup with Megadeath Buster. |
| Megadeath Buster (Standard Mode/Mode: Arbalest) → ↘ ↓ ↙ ← → + S |
The character is in a counter hit state until the end of the recovery. |
| Weapons Free ↓ ↙ ← ↓ ↙ ← + HS |
Startup changed from 18F → 16F. Increased forward movement speed. |

We have strengthened her various pokes, to allow her to better get an advantage in neutral.
We have added a vacuum effect to her S attacks, and revised the recovery of Unity.
We have added a new effect to RESISTANCE GLITCH which was rarely used, making it a viable option in strings.
On the other hand, we have revised her overall combo composition to adjust it so that her combos are not overly extended mid-screen.
We have also adjusted CONTAGION to prevent overly extended combo damage.
We have added a vacuum effect that draws the opponent in to Far S and Crouching S.
Her Command Normal 3 (S after Far S) and Command Normal 4 (↓+S after Crouching S) with the same vacuum effect could only be used with a fixed timing, making it easy for the opponent to instant block.
By adding the vacuum effect to Far S and Crouching S as well, this makes charged Monowire an effective option against opponents aiming to instant block Command Normal 3 or Command Normal 4.
We have reduced the recovery of Unity, and the third hit now launches the opponent.
This makes it easier to use in neutral, and possible to approach the opponent on hit.
However, we have removed the wall bounce effect in the corner, making it harder to use mid-combo.
We have adjusted RESISTANCE GLITCH so that it applies a Guard Crush effect to Standing HS, Crouching HS, and →+HS while active.
After triggering Guard Crush with these moves, you can make the opponent block charged Monowire without any openings, making it possible to perform powerful pressure.
We have adjusted the blowback and active frames of Sprint Attack: Sweep and Sprint Attack: Cross Up to make it harder to extend after hitting in a combo.
We have also extended the intervals between damage dealt by CONTAGION to restrict the possibility of extending damage using CONTAGION in long combos.
| Adjustment Details | |
|---|---|
| → + P | ▼Hitbox adjustment Changed the timing when the upper hurtbox is smallest from 3F → 4F. |
| Close Standing S | ▼Hitbox adjustment Changed attack hitboxes above a certain height into follow-up hitboxes. |
| Far Standing S | Now pulls the opponent in upon touching the opponent. |
| Crouching S | Now pulls the opponent in upon touching the opponent. |
| Standing HS | ▼Blowback adjustment No longer launches the opponent on ground hit. |
| → + HS |
Startup changed from 19F → 17F. ▼Hitbox adjustment |
| Command Normal 3 S after Far Standing S |
Now activates even if ↓ is input. Recovery changed from 19F → 16F. ▼Blowback adjustment |
| Command Normal 4 ↓ + S after Crouching S |
Recovery changed from 20F → 16F. ▼Blowback adjustment |
| Monowire ↓ ↙ ← + HS (Hold OK) |
Fixed an issue where the proximity block range had become too long. ▼Hitbox adjustment |
| Monowire (Lightly Hold Versions) ↓ ↙ ← + HS (Lightly Hold) |
▼Blowback adjustment Increased horizontal blowback after ground bounce. |
| Unity ↓ ↘ → + S (Hold OK) |
Recovery changed from 52F → 43F. ▼Blowback adjustment |
| Sprint Attack - Sweep S during Sprint Attack |
Active frames changed from 6F → 3F. Reduced knockback on hit. ▼Blowback adjustment |
| Sprint Attack - Cross Up HS during Sprint Attack |
Base damage scaling changed from 80% → 70%. ▼Blowback adjustment |
| Monowire - Breakout → ↓ ↘ + HS |
Counter hit effect removed. Recovery changed from 36F → 49F. |
| Live Wire → ↘ ↓ ↙ ← → + HS |
Condition of the opponent's health required to transition to Finisher: Deepdive after Live Wire hits changed from 15% → 20%. The character is in a counter hit state until the end of the recovery. Can no longer Roman Cancel. ▼Hitbox adjustment |
| CONTAGION | Damage interval changed from 15F → 30F. |
| RESISTANCE GLITCH |
RAM usage changed from 9 → 11. Duration changed from 480F → 240F. Added Guard Crush effect to Standing HS, Crouching HS, and → + HS while active. |
Future announcements regarding updates will be shared on our official website as well as the Guilty Gear Official (X) account.
Thank you for your continued support of Guilty Gear -Strive-.